I touched briefly on
Stevenson screens
in my
post on hygrometry,
mostly with regard to how cool it is that their namesake was the father of the
famed author.
I'd never built one myself, and never planned on doing until I get around to
building a full-on weatherstation like I will, uh, one of these days.
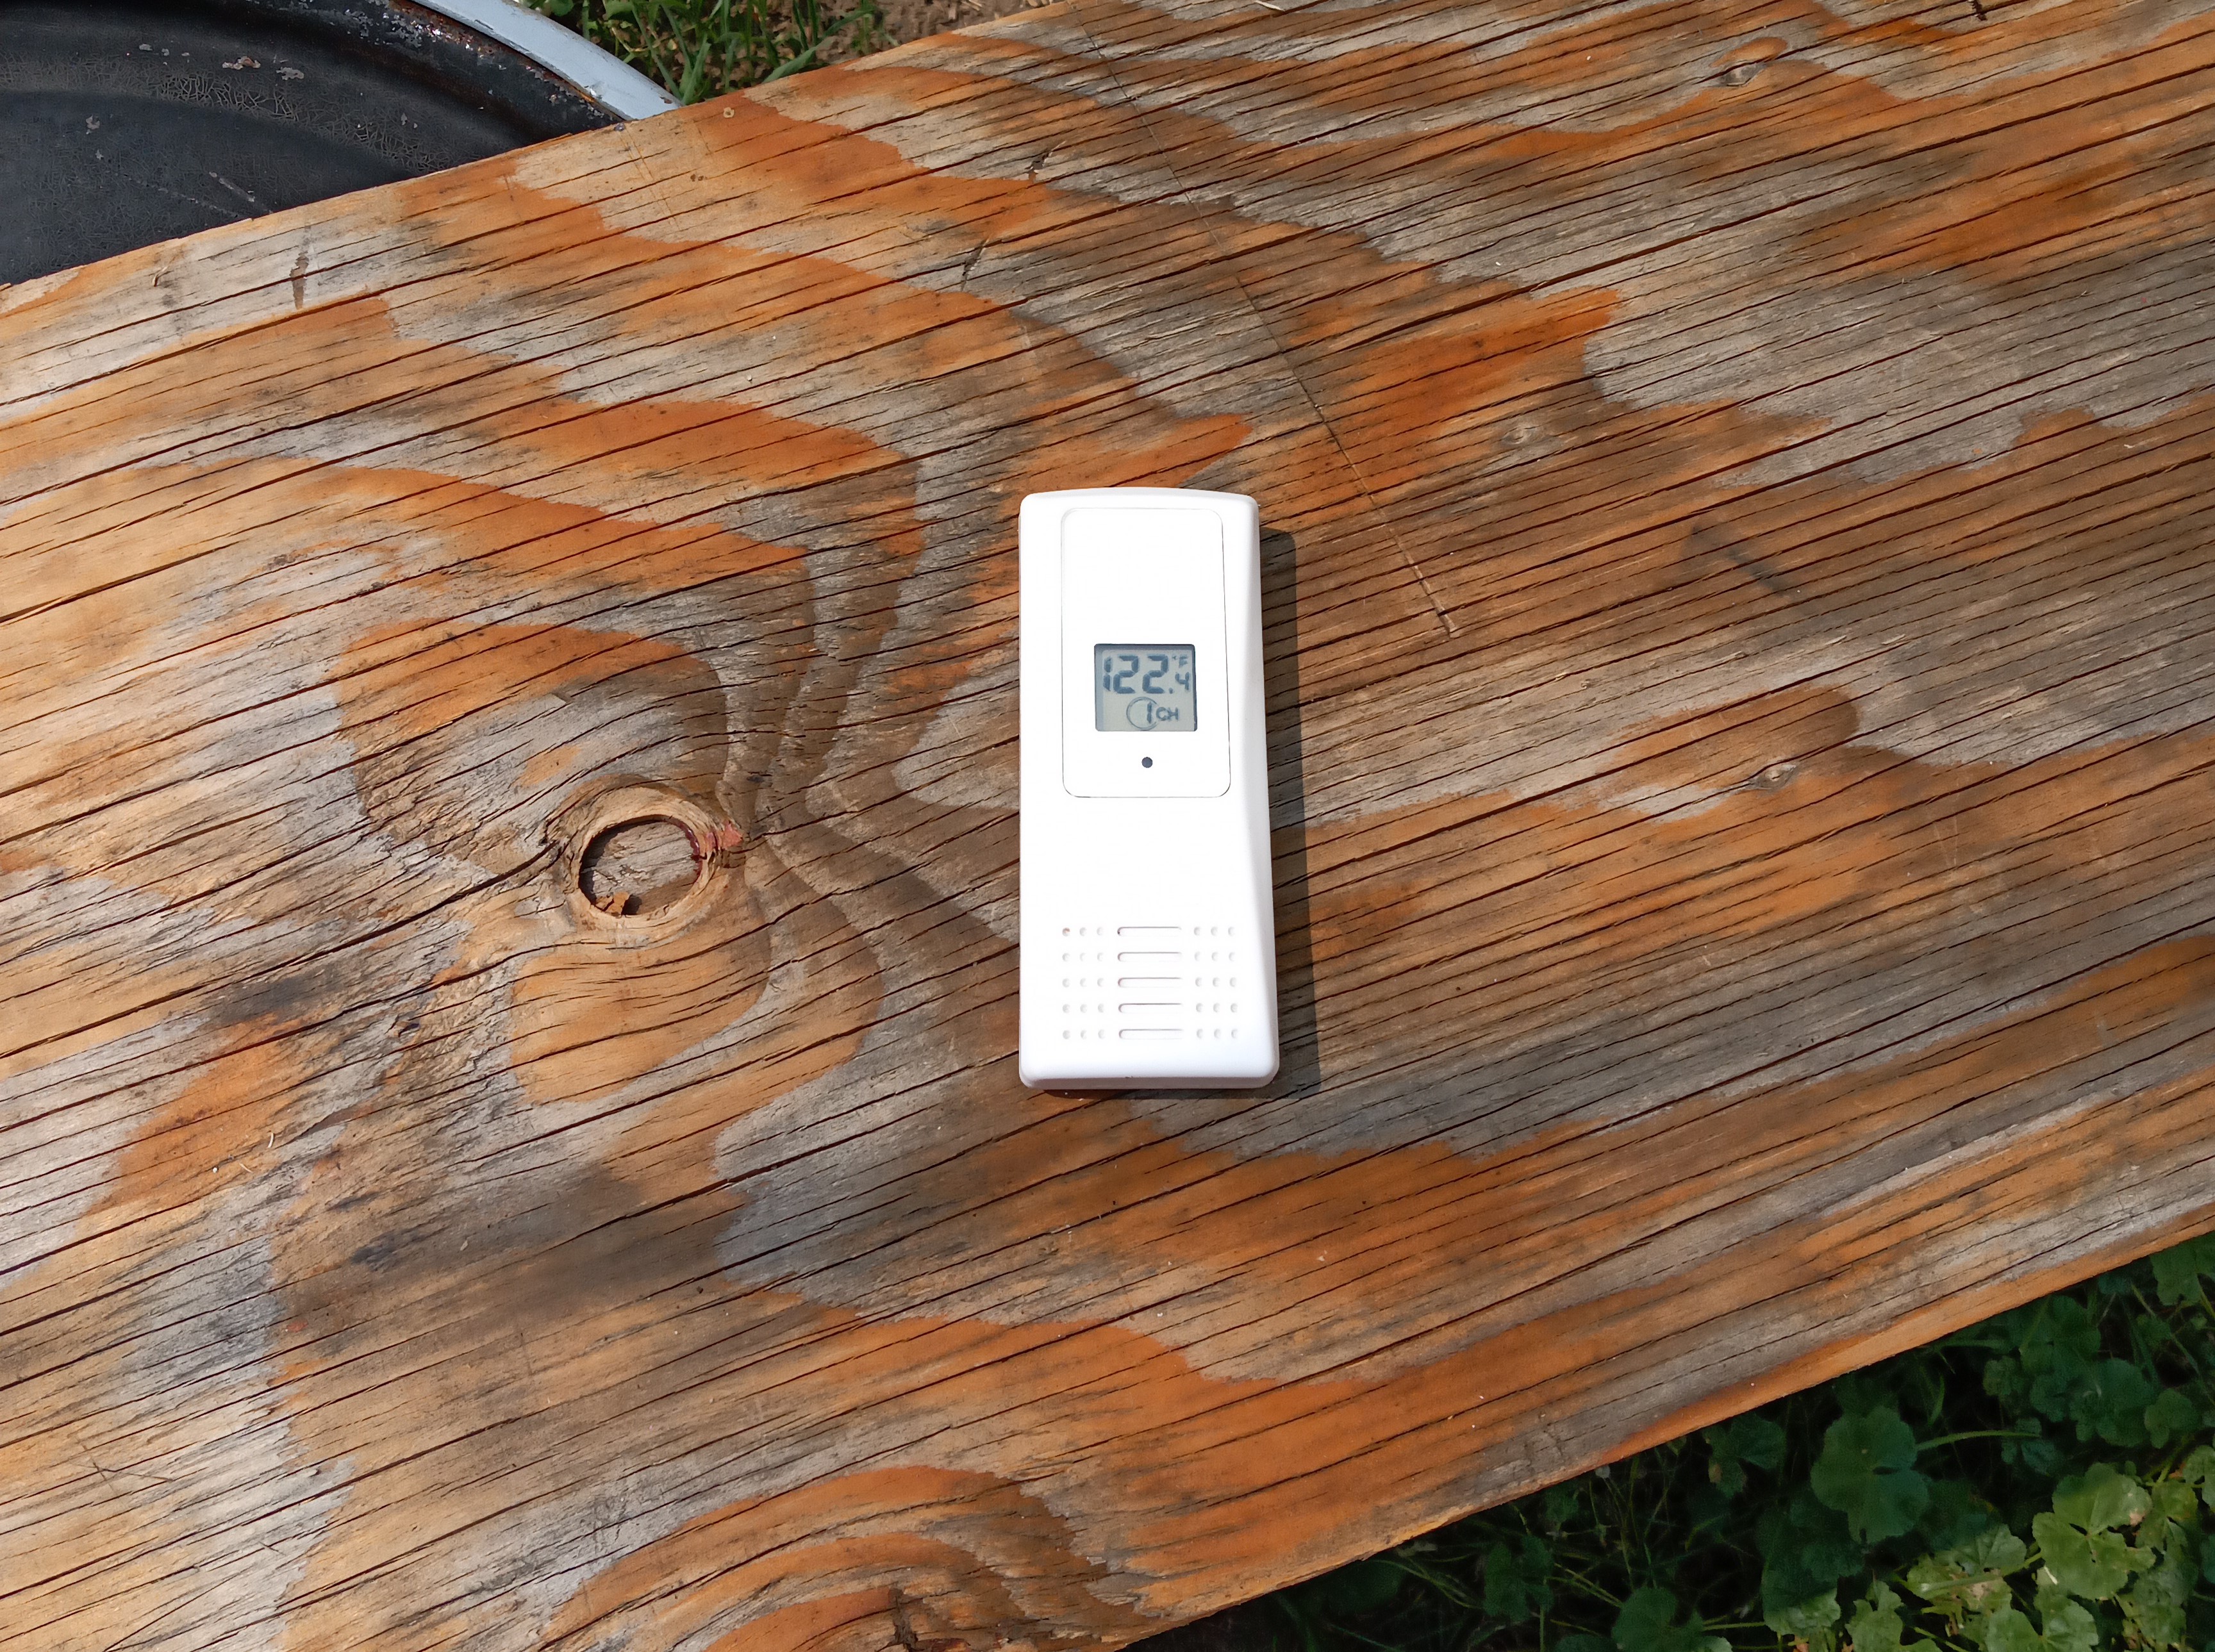
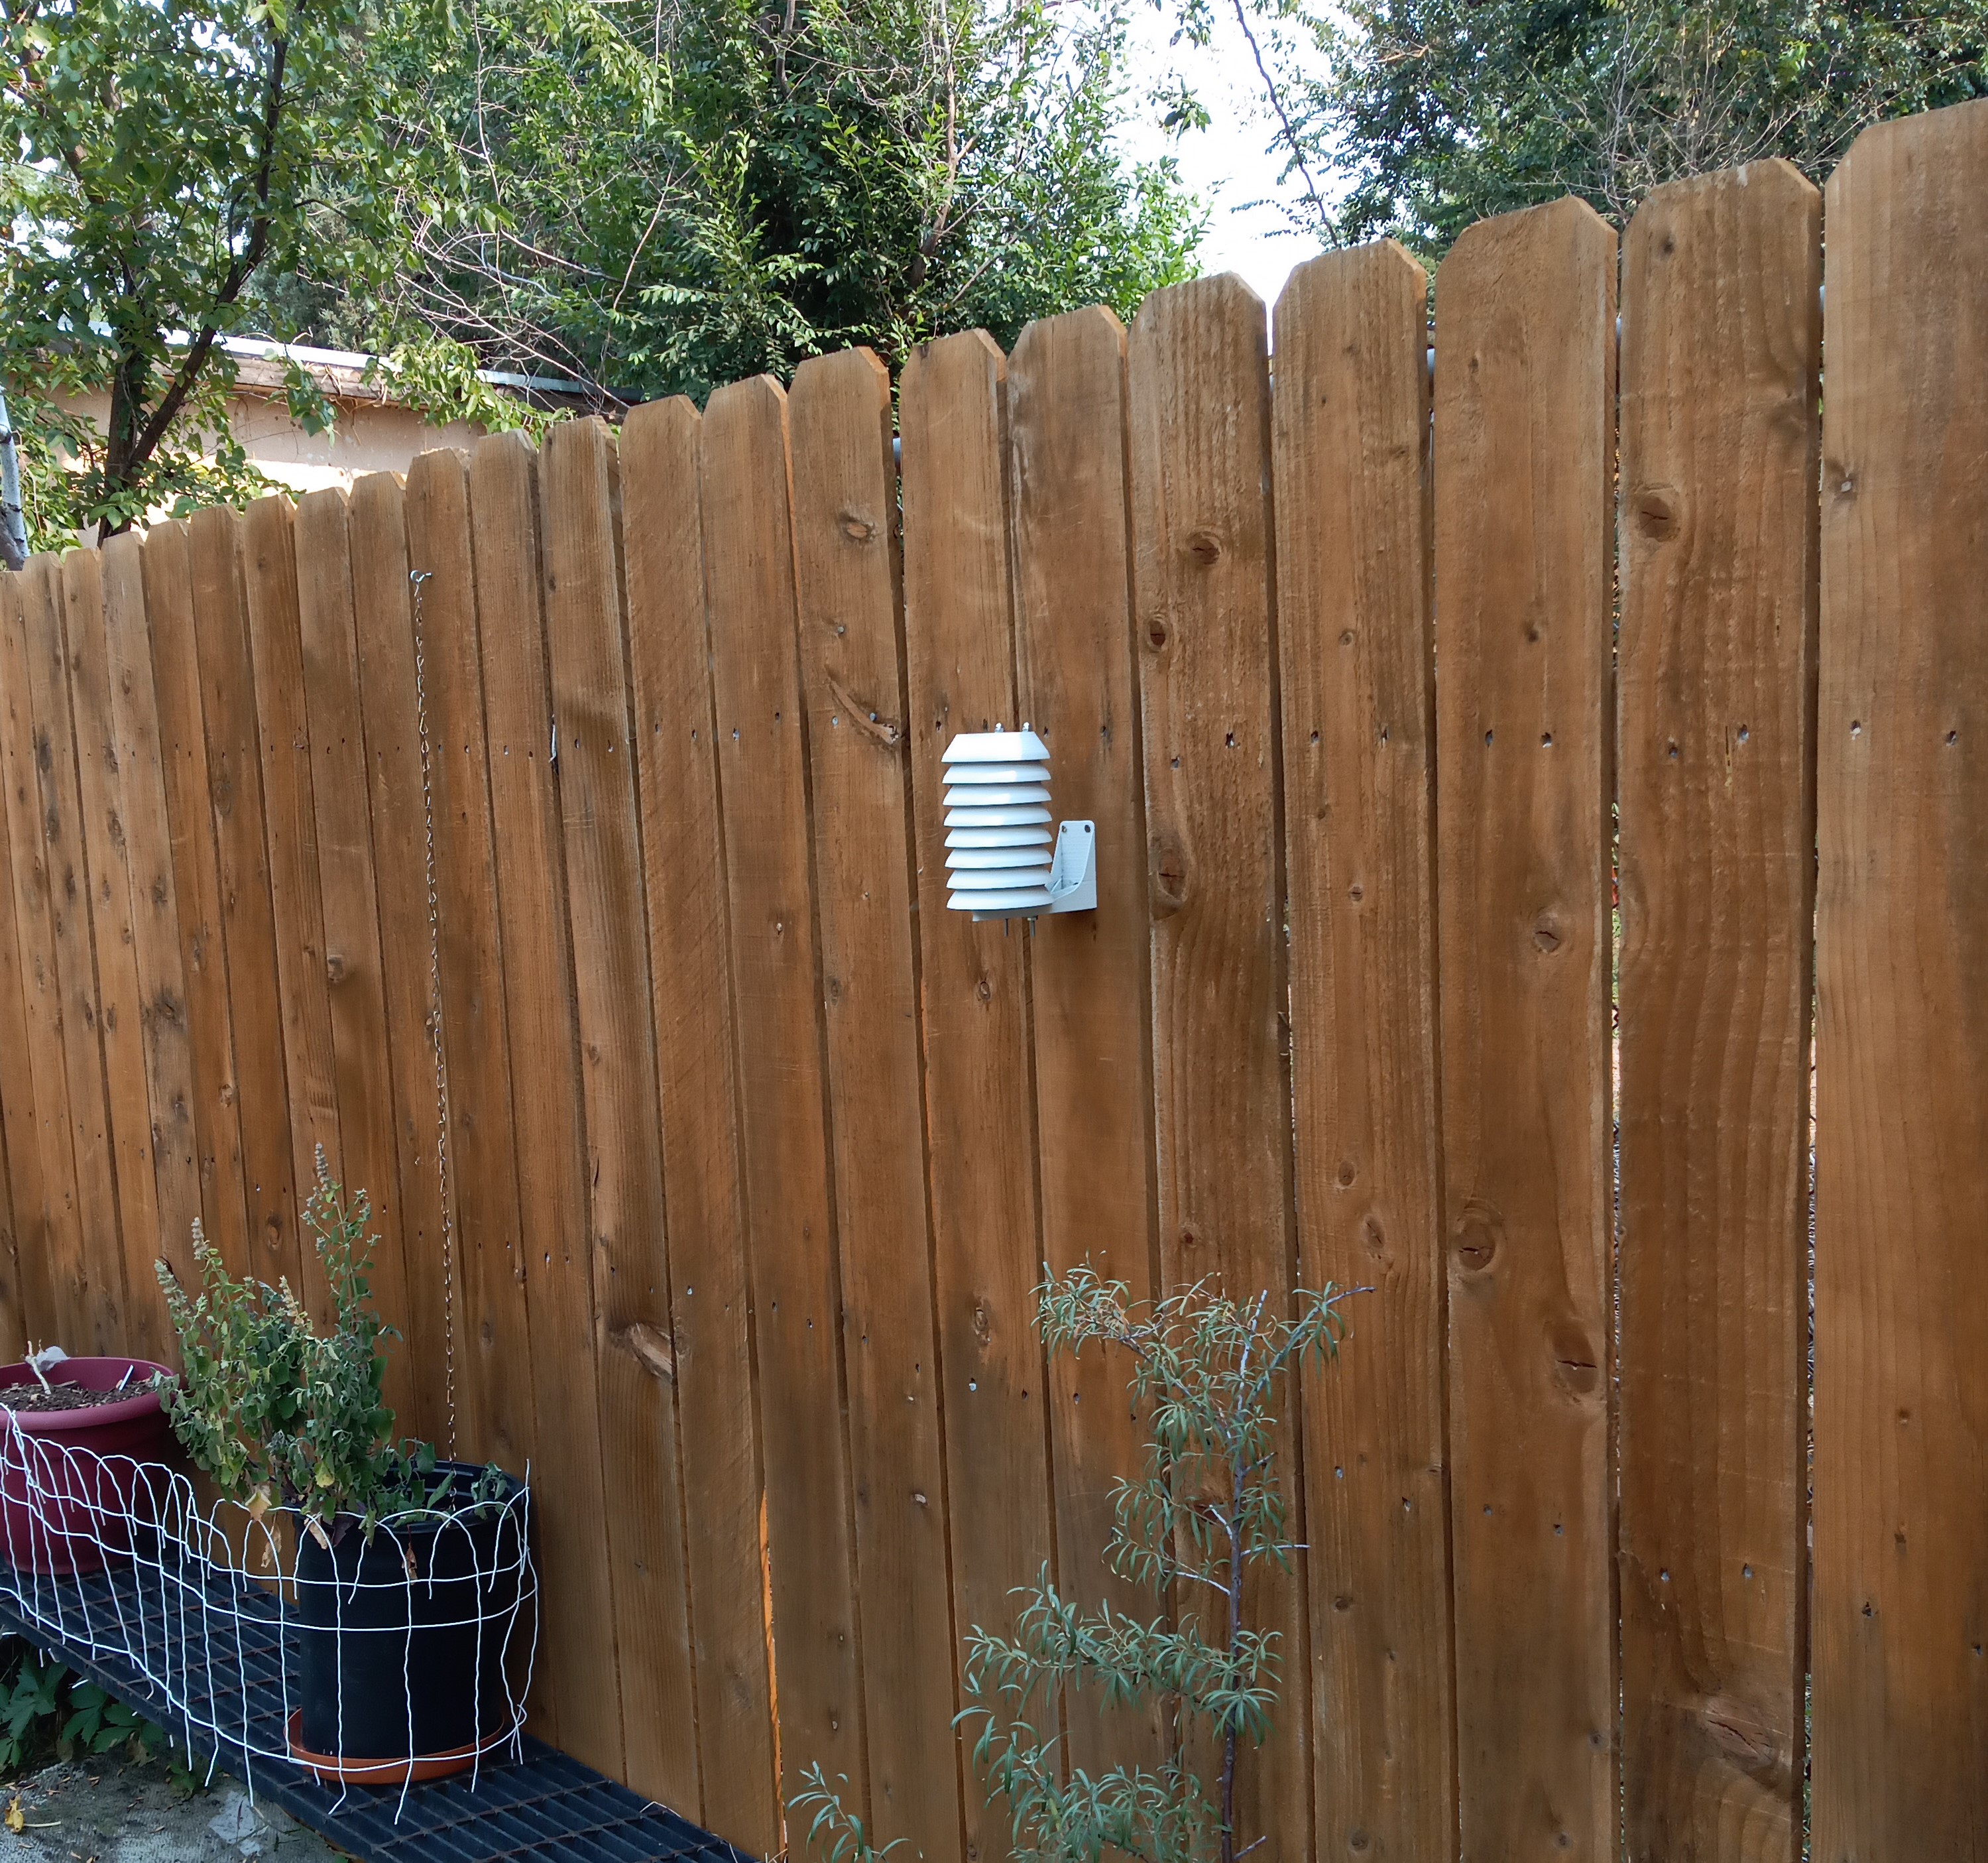
Then I realized: my girlfriend has a cheap wireless indoor/outdoor thermometer,
and the remote sensor can be a bit, uh, touchy:
Things like this are why we have 3D printers, so I decided to see what might be
publicly available as far as enclosure designs and run one off real quick.
It turns out, Thingiverse has
many options;
I picked
this one
somewhat arbitrarily.
This was a pretty cool model and brought me a little farther into the mindset
of 3D printing than I've been in the past.
I know there are some pretty radical things you can do once you get there
—
printing individual screw threads or a ball in a cage or an entire planetary
gearset in situ
—
but so far I've always treated it as just another traditional
process, proceding from a drawing and using exact dimensions with known
tolerances etc.
This was a different experience:
since I didn't really have any specific dimensions to match, I just scaled it
with the dumb slider in my slicing software and ran test prints until it was
about the right size to accomodate the sensor.
Also, the height of the whole assembly isn't fixed, instead you can print as
many of the annular section as you want to make it as tall as you want.
I did that until it looked reasonable, drove a self-drilling plastic screw
into the bulkhead to mount the sensor, found some all-thread and acorn nuts to
tie it all together and called it good.
At the end of the day, it was pretty fun building something so
fast-and-(literally-) loose, the sensor works much better, and I think it looks
altogether quite professional hanging there on the back fence.
My girlfriend teaches at a local college which has what they call an
"innovation and creativity center."
This is like a hackerspace for college students: they have a small laser
cutter, a bank of FDM machines, the standard stuff.
Its purpose is to give students access to resources for product design, rapid
fabrication, and other resources that students might employ throughout their
studies.
When COVID hit and they sent most of the students home, a small group of
faculty and remaining student workers started turning that equipment to
produce PPE for local hospitals and other communities in need.
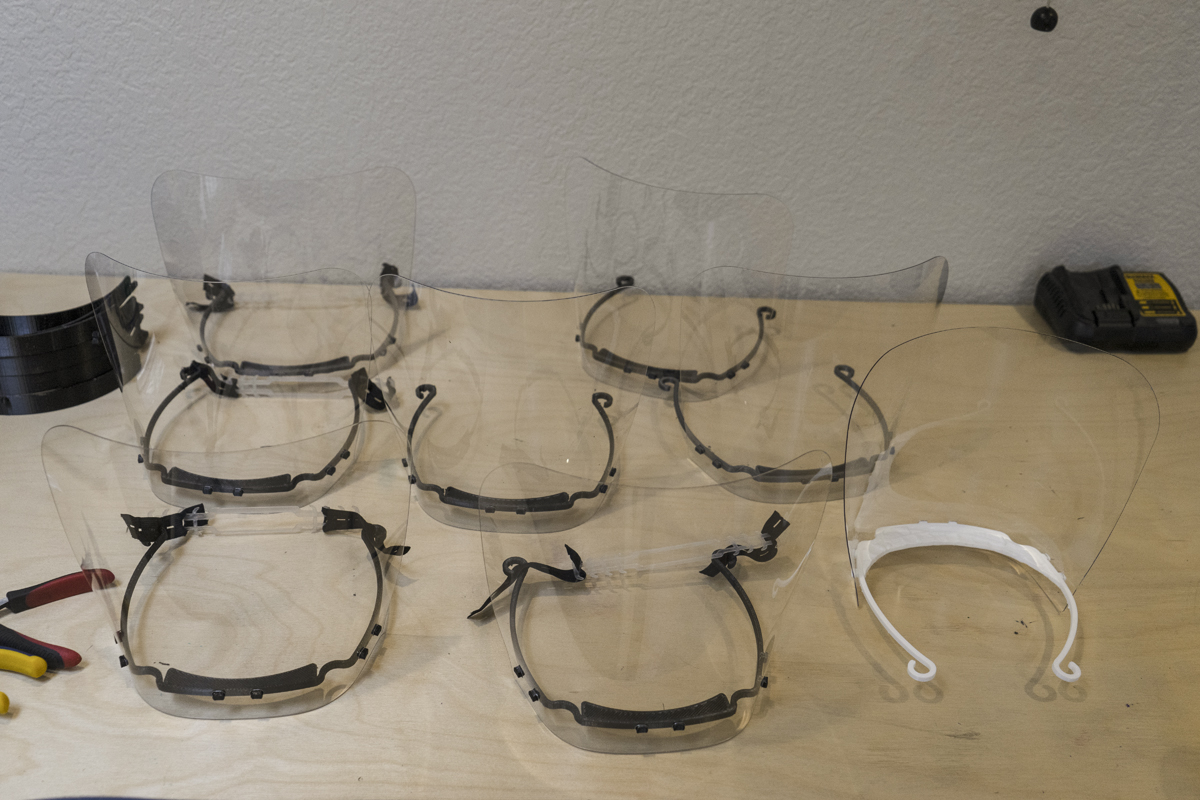
So now they're making face shields, with a throughput of a few hundred units
a week.
They're making a couple different models from the many that exist now (the
fire department has stated a preference for one model, the hospitals like a
different one) but which are of the same general construction.
This consists of an FDM
or resin-cast frame, which holds an elastic piece in back for securement and
a piece of transparent PET sheet that comprises the shield.
The latter piece is laser-cut both for general shape and for holes to mate the
mounting studs projecting from the frame.
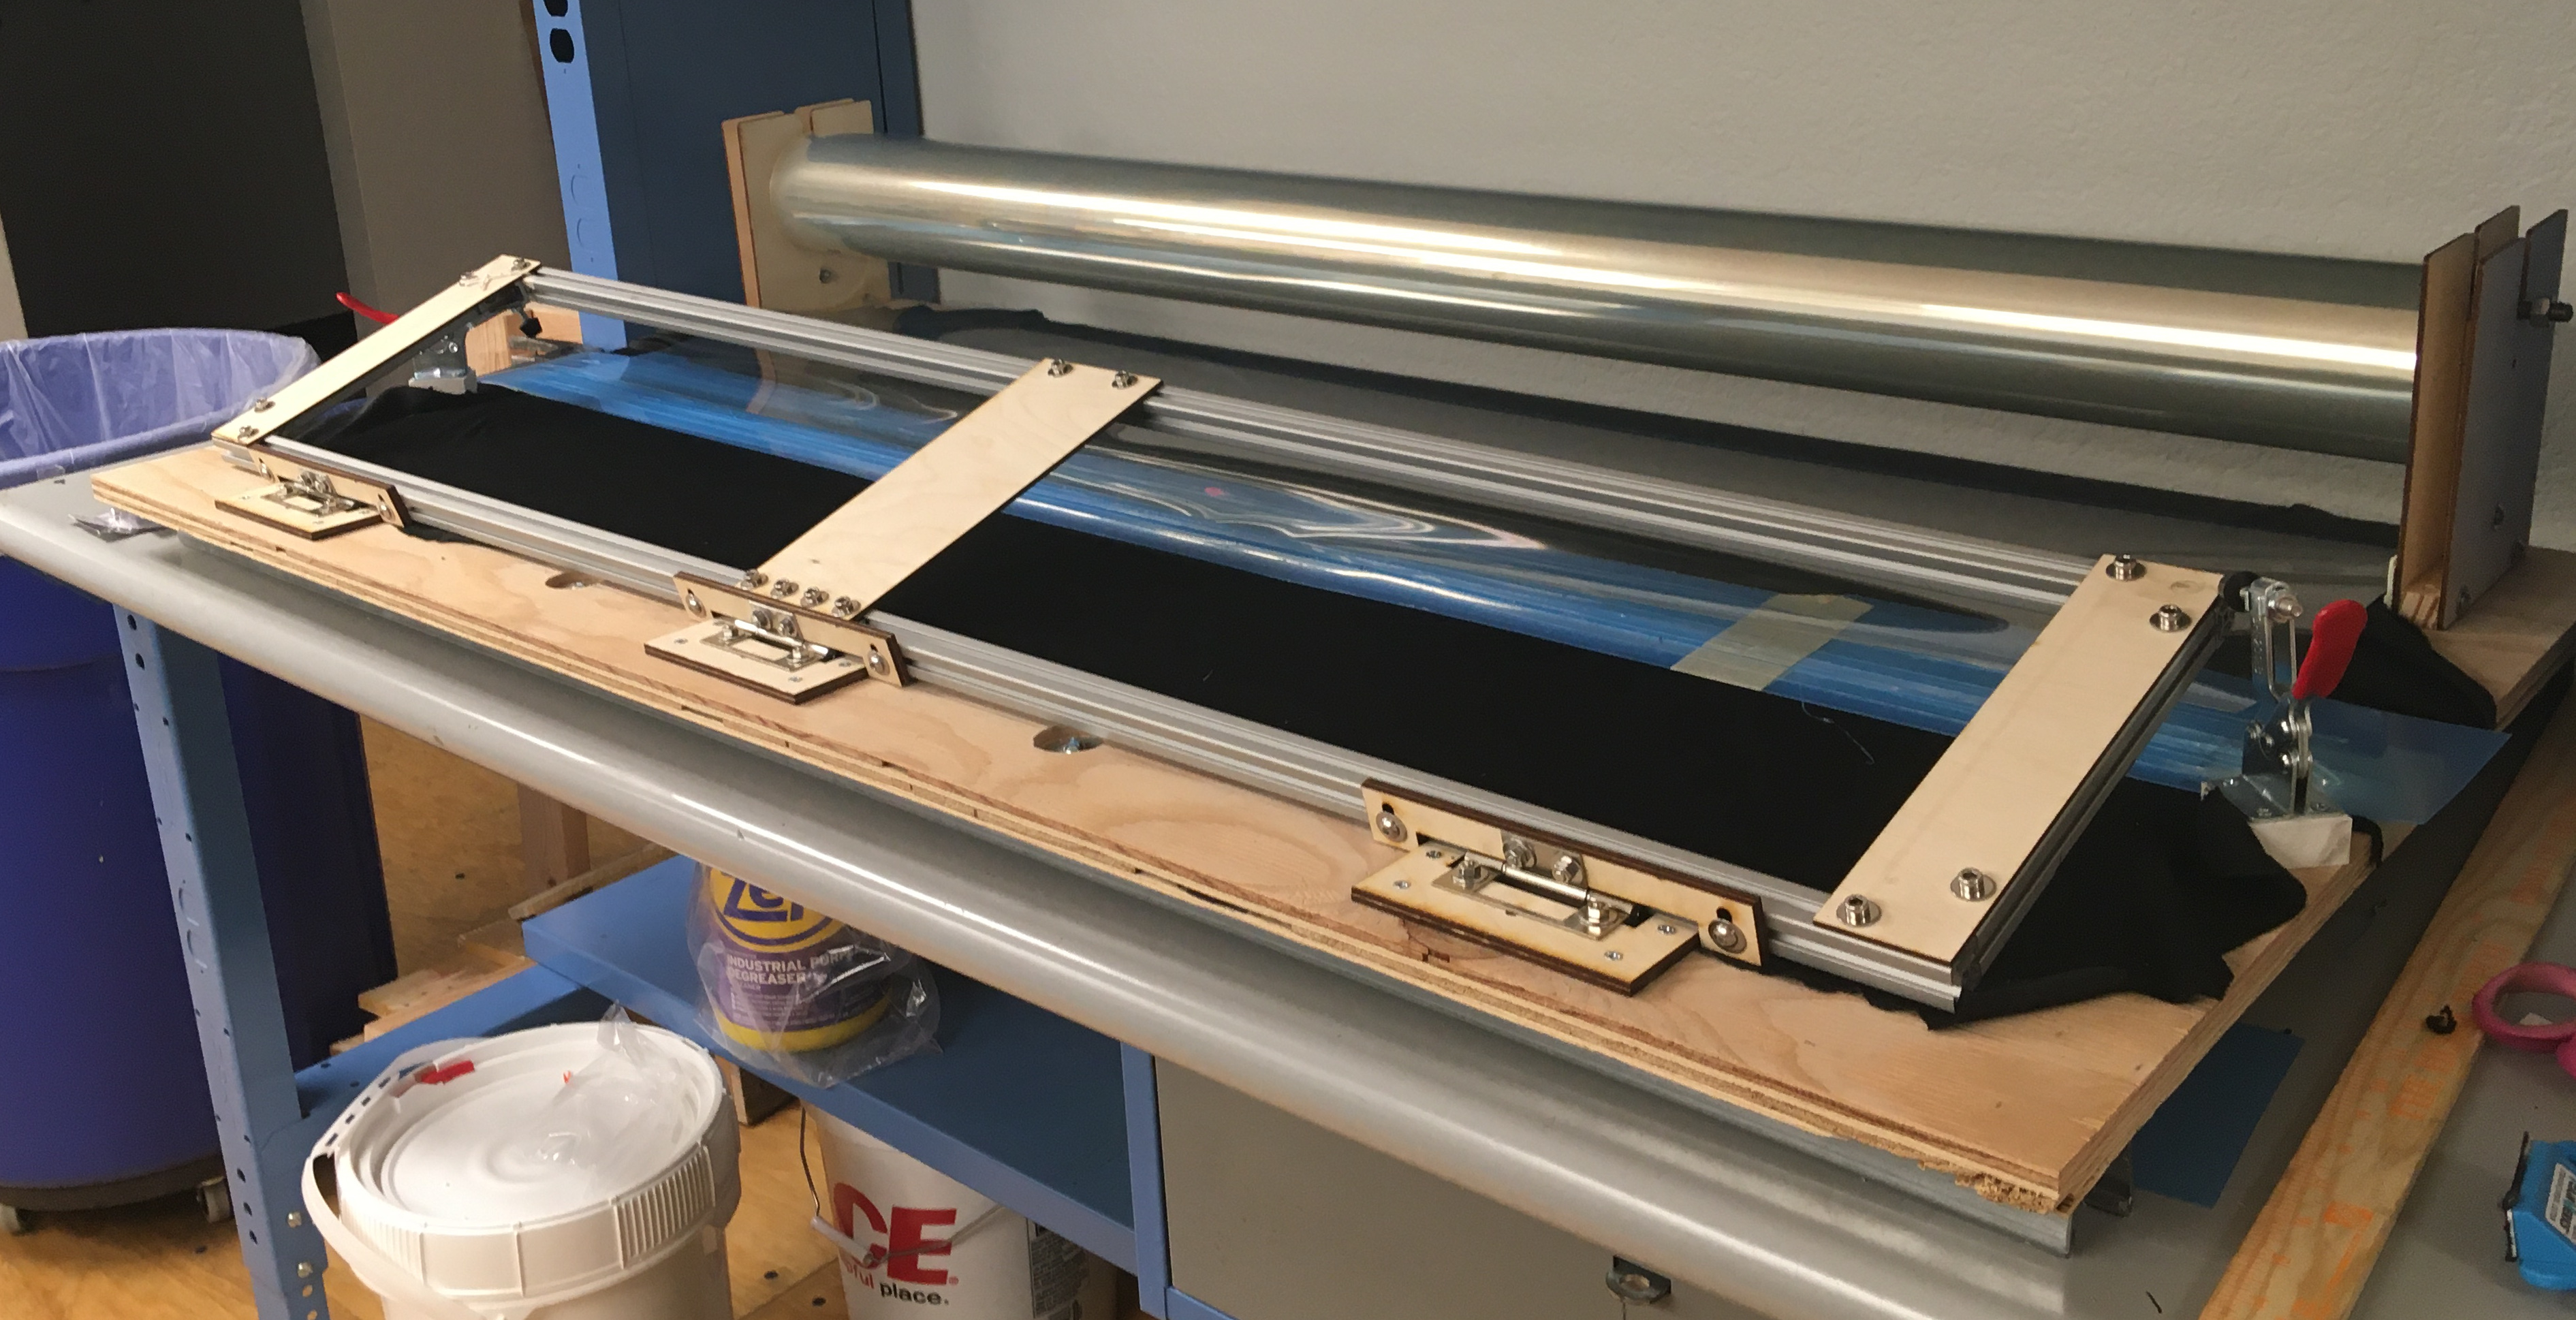
One problem they were having is that the PET sheet they've sourced comes
on giant rolls, and the material needs to be rough-cut down to fit on the
16x12" bed of the laser cutter.
The rolls are 48" wide, so this is easily enough cut down to either dimension,
but the difficulty comes in making a transverse cut across 48" of material
that's both reasonably square and also close to the 10" dimension required by
the design.
Some slop is forgivable, since each shield is cut entirely from the interior
of a piece and none of the rough cuts forms a finished edge.
But it was still proving awkward and cumbersome to measure and square this by
hand while managing the not-insignificant bulk of the roll itself.
This had become a bottleneck in their production process, so I decided
to build a fixture to help.
Design
Design requirements were pretty straightforward,
the fixture needed to provide three things:
- Some means of retaining the spool and allowing it to unreel in slightly more
elegant fashion than just flopping around on the work surface.
If this can help prevent its getting scratched, so much the better.
- Some form of stop, square to the axial dimension of the reel and against
which the working end of the material can be abutted and made fast.
- Some sort of guide, rigidly fixed at the desired distance of ten inches
from the stop, along which a cutting tool may be worked.
While this allowed a lot of flexibility in implementation, a challenge was the
timing.
This was late March, when Amazon was still quoting lead times of 4-6
weeks on "nonessential" items, hardware and home improvement stores were
basically closed and I myself was trying not to leave the house.
Here's what I made do with parts (mostly) on hand:
Assembly
The base is cut from some 3/4" subfloor plywood I had lying around.
This was plenty rigid but a little more warped than was reasonable for the
application, so I counterbored from the top and tied into a couple
lengths of steel strut-channel, which got it straightened enough.
With the limited materials I had to work with, this construction is going to
be a bit rough.
The reel is stood-off on plywood that the innovation center was kind enough to
laser for me, sandwiching some scrap 1x1 for rigidity and tie-in to the base.
This plywood is slotted to accommodate a length
of 3/8" all-thread, on which the ID of the spool sits.
The cutting guide is formed by the T-slot aluminum frame you see swung up
toward the image foreground.
This is corner-braced internally but also tied to more plates of laser-cut
plywood you see up top.
Edge-to-edge the frame is 10" wide,
and serves to measure this dimension in the direction toward the spool from
the plywood seen screwed into the base, to which the hinges are affixed
and which serves as the material stop.
When the frame swings down, it then defines a transverse line 10" from the
stop.
It can be toggle-clamped to hold the material in place, allowing the
operator both hands free to manage the cutting tool.
Lessons learned
Altogether this was a very edifying experience, for a couple of different
reasons.
From a systems perspective, this was a great object lesson in limiting
features to scope of project.
The engineer in me looks at requirement (1) above and
immediately starts picturing endcaps that mate the ID of the spool and ride
on sleeve bearings about the axial shaft such that the spool is balanced
around its CoG and spins freely and etc. etc.
That part of me is absolutely horrified at the thought of the spool just
rough-riding over a threaded rod like a roll of toilet paper.
Yet, it turns out, that works just fine.
Any attempt to build a more elaborate mechinism would have taken longer to
design and fabricate, imperiled ourselves of a re-roll if something didn't fit
or otherwise work, and been more likely to fail "in the field."
Similarly, I spent a lot of time thinking about requirement (3) and whether it
would be easiest to build a hot-wire cutter versus a straight, hook, or rotary
blade, what type of guide would best support same, what kind of clearance or
cut-out might be required to accomodate the tool in the bed, etc. etc. before
shelving all of that and just building a straight-edge.
I figured that, if a captive tool were that important, I'd hear about it.
In point of fact, the operators have made do with a manual knife just fine;
the straight-edge was all that was required.
There's a lot of talk in engineering circles about the perils of
overengineering,
YAGNI,
project scope, etc.
For all that talk, actually being able to define and hit targets is still
largely a matter of good judgement and experience and something even seasoned
engineers often fail at.
Being able to take something from concept to delivery and see that it
succesfully meets a need is a rare pleasure and one that keeps me in these
fields.
From a personal perspective, it was also very gratifying to be able to execute
with the limited parts and supplies I had on hand.
For years (at least when it comes to small parts like fasteners and toggle
clamps), my policy has been to buy 25-100% more than I need for the current
project "in case I need 'em for something else later."
This doesn't always feel like the right thing to do, what with the additional
clutter it brings and the alternative convenience of modern supply chains.
Most of my personal projects spend a long time in what we'll call the
"concept/pre-procurement phase."
Being forced by circumstance out of that and directly into execution with just
the stock I'd accumulated "in case I need it" was, again, a very gratifying
and singular experience.
Notes