I touched briefly on
Stevenson screens
in my
post on hygrometry,
mostly with regard to how cool it is that their namesake was the father of the
famed author.
I'd never built one myself, and never planned on doing until I get around to
building a full-on weatherstation like I will, uh, one of these days.
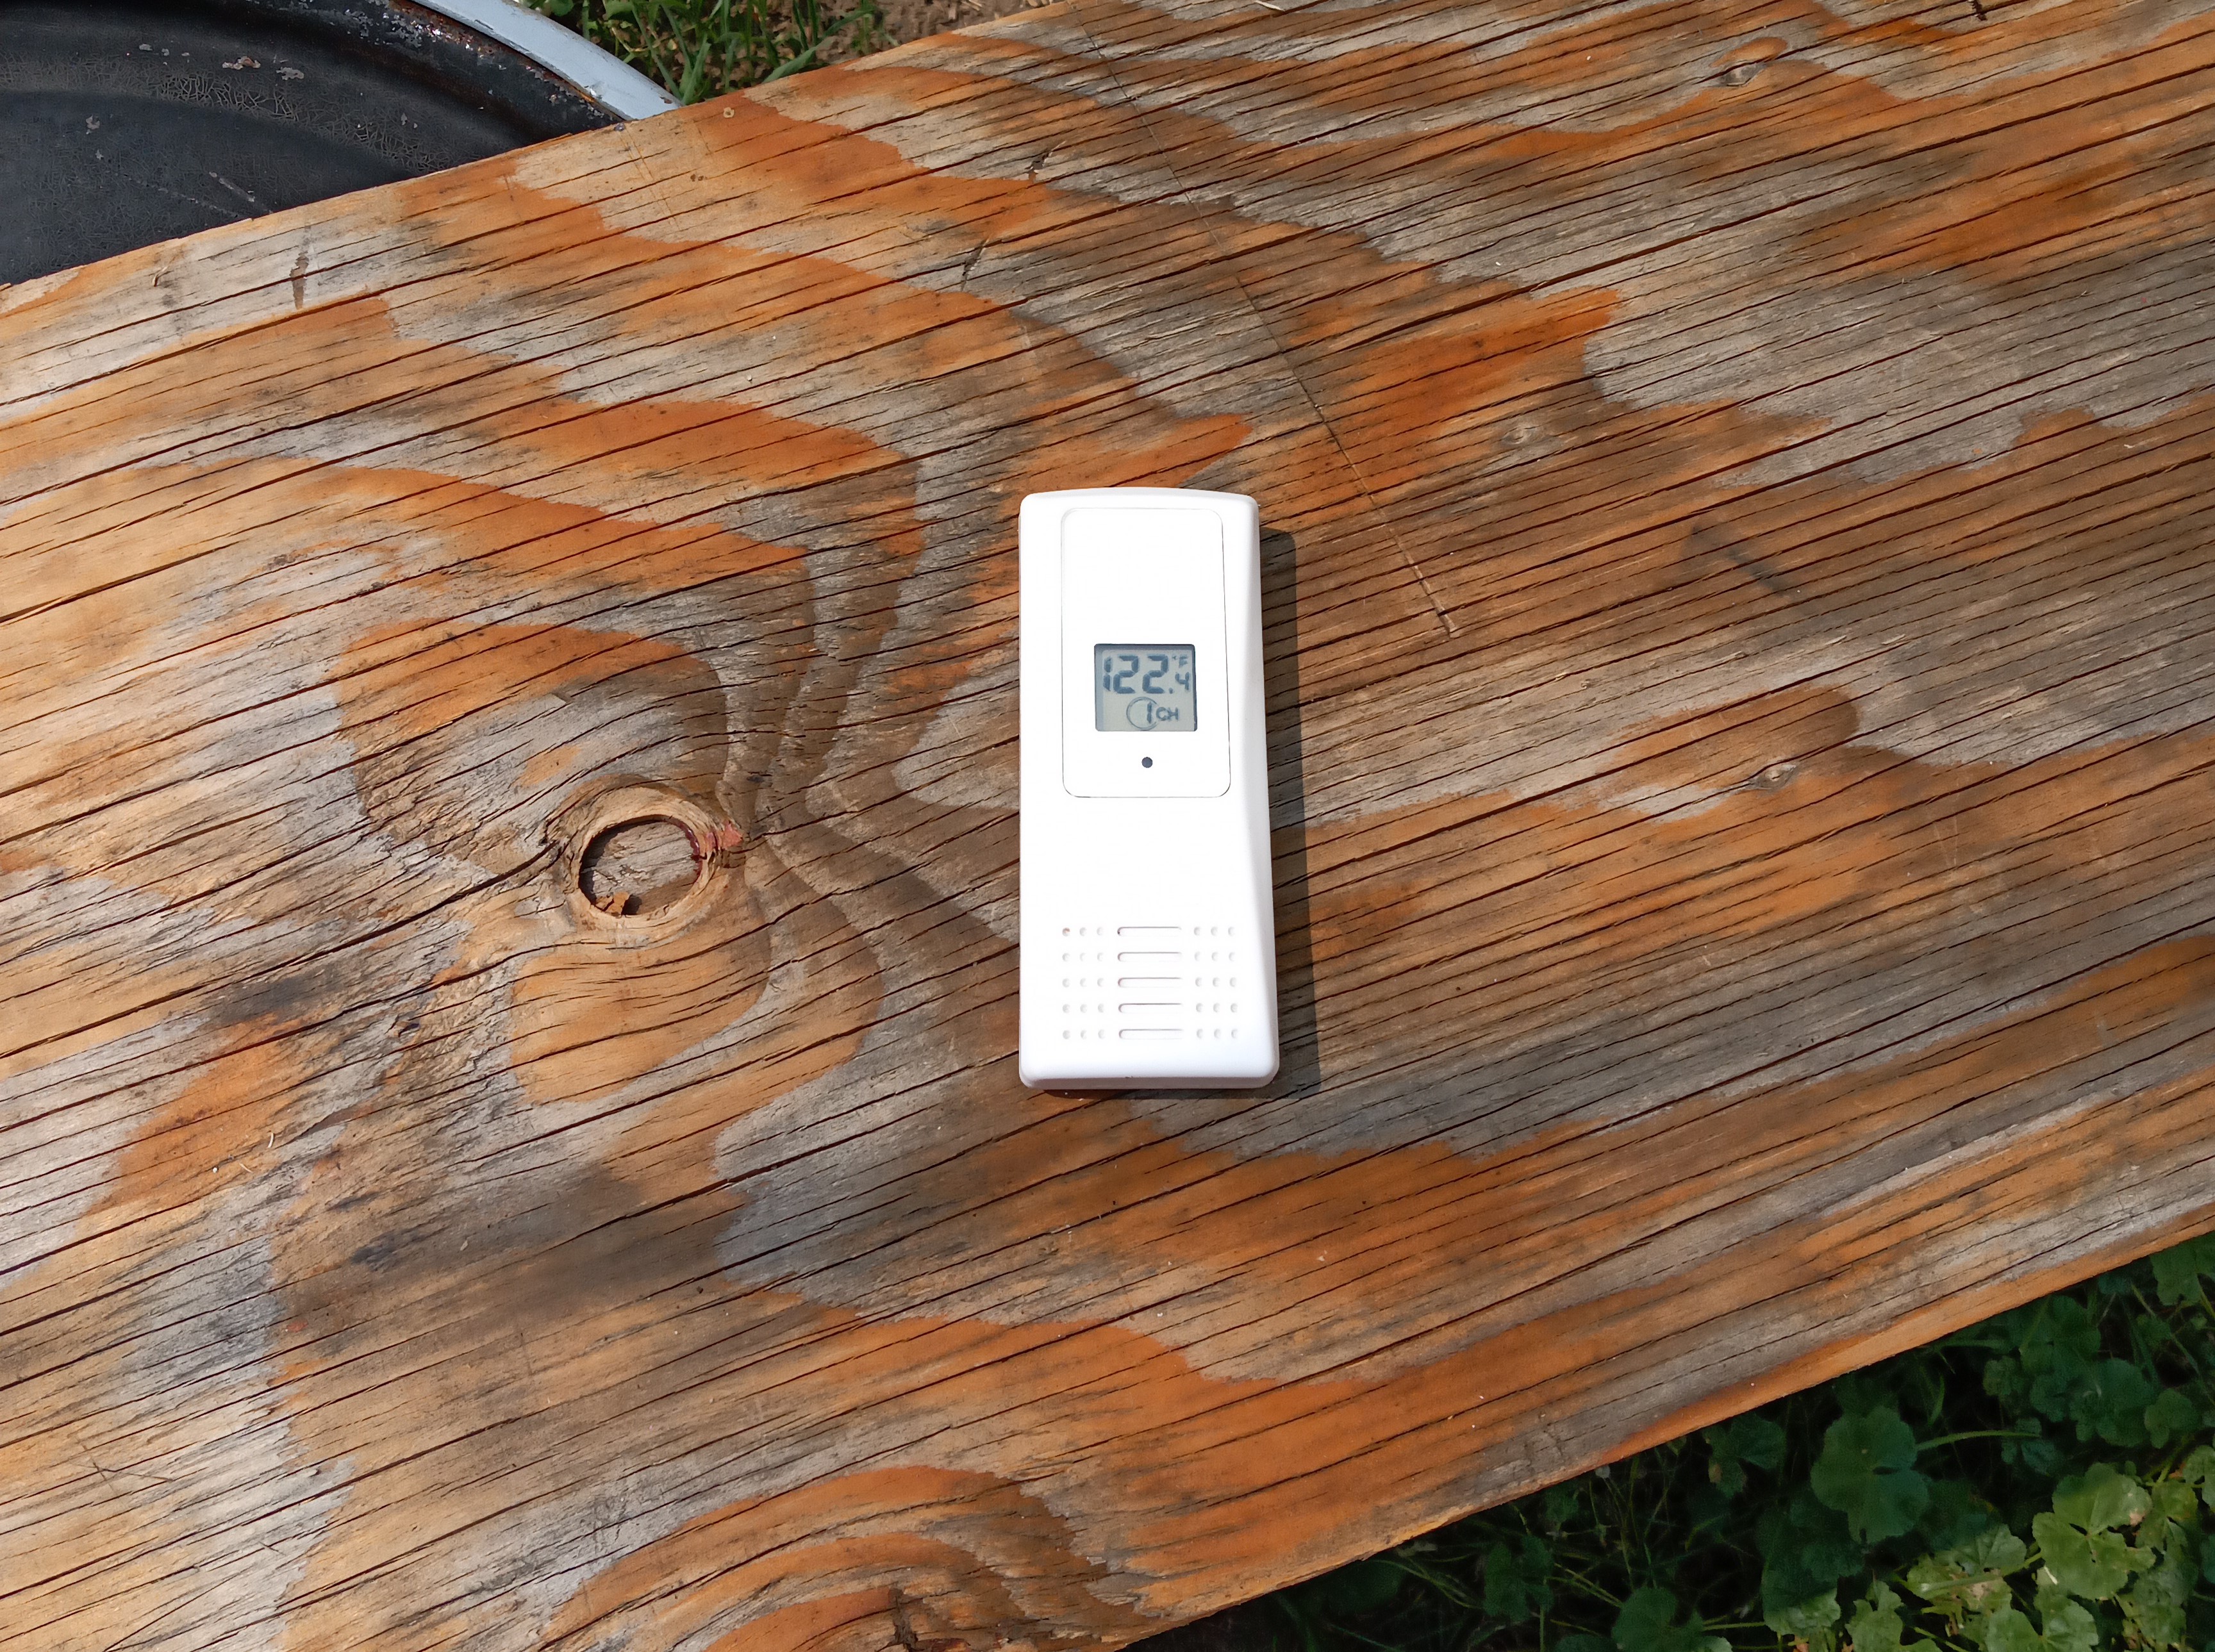
Then I realized: my girlfriend has a cheap wireless indoor/outdoor thermometer,
and the remote sensor can be a bit, uh, touchy:
I promise it was not 122degF when this picture was taken (low 80s, if even).
Sometimes I think "keep out of direct sunlight" warnings aren't taken
seriously enough, especially at our altitude.
(With apologies to any readers unaccustomed to Farenheit units, this
reading is about 50degC, with ambient temperature below 30).
Things like this are why we have 3D printers, so I decided to see what might be
publicly available as far as enclosure designs and run one off real quick.
It turns out, Thingiverse has
many options;
I picked
this one
somewhat arbitrarily.
This was a pretty cool model and brought me a little farther into the mindset
of 3D printing than I've been in the past.
I know there are some pretty radical things you can do once you get there
—
printing individual screw threads or a ball in a cage or an entire planetary
gearset in situ
—
but so far I've always treated it as just another traditional
process, proceding from a drawing and using exact dimensions with known
tolerances etc.
This was a different experience:
since I didn't really have any specific dimensions to match, I just scaled it
with the dumb slider in my slicing software and ran test prints until it was
about the right size to accomodate the sensor.
Also, the height of the whole assembly isn't fixed, instead you can print as
many of the annular section as you want to make it as tall as you want.
I did that until it looked reasonable, drove a self-drilling plastic screw
into the bulkhead to mount the sensor, found some all-thread and acorn nuts to
tie it all together and called it good.
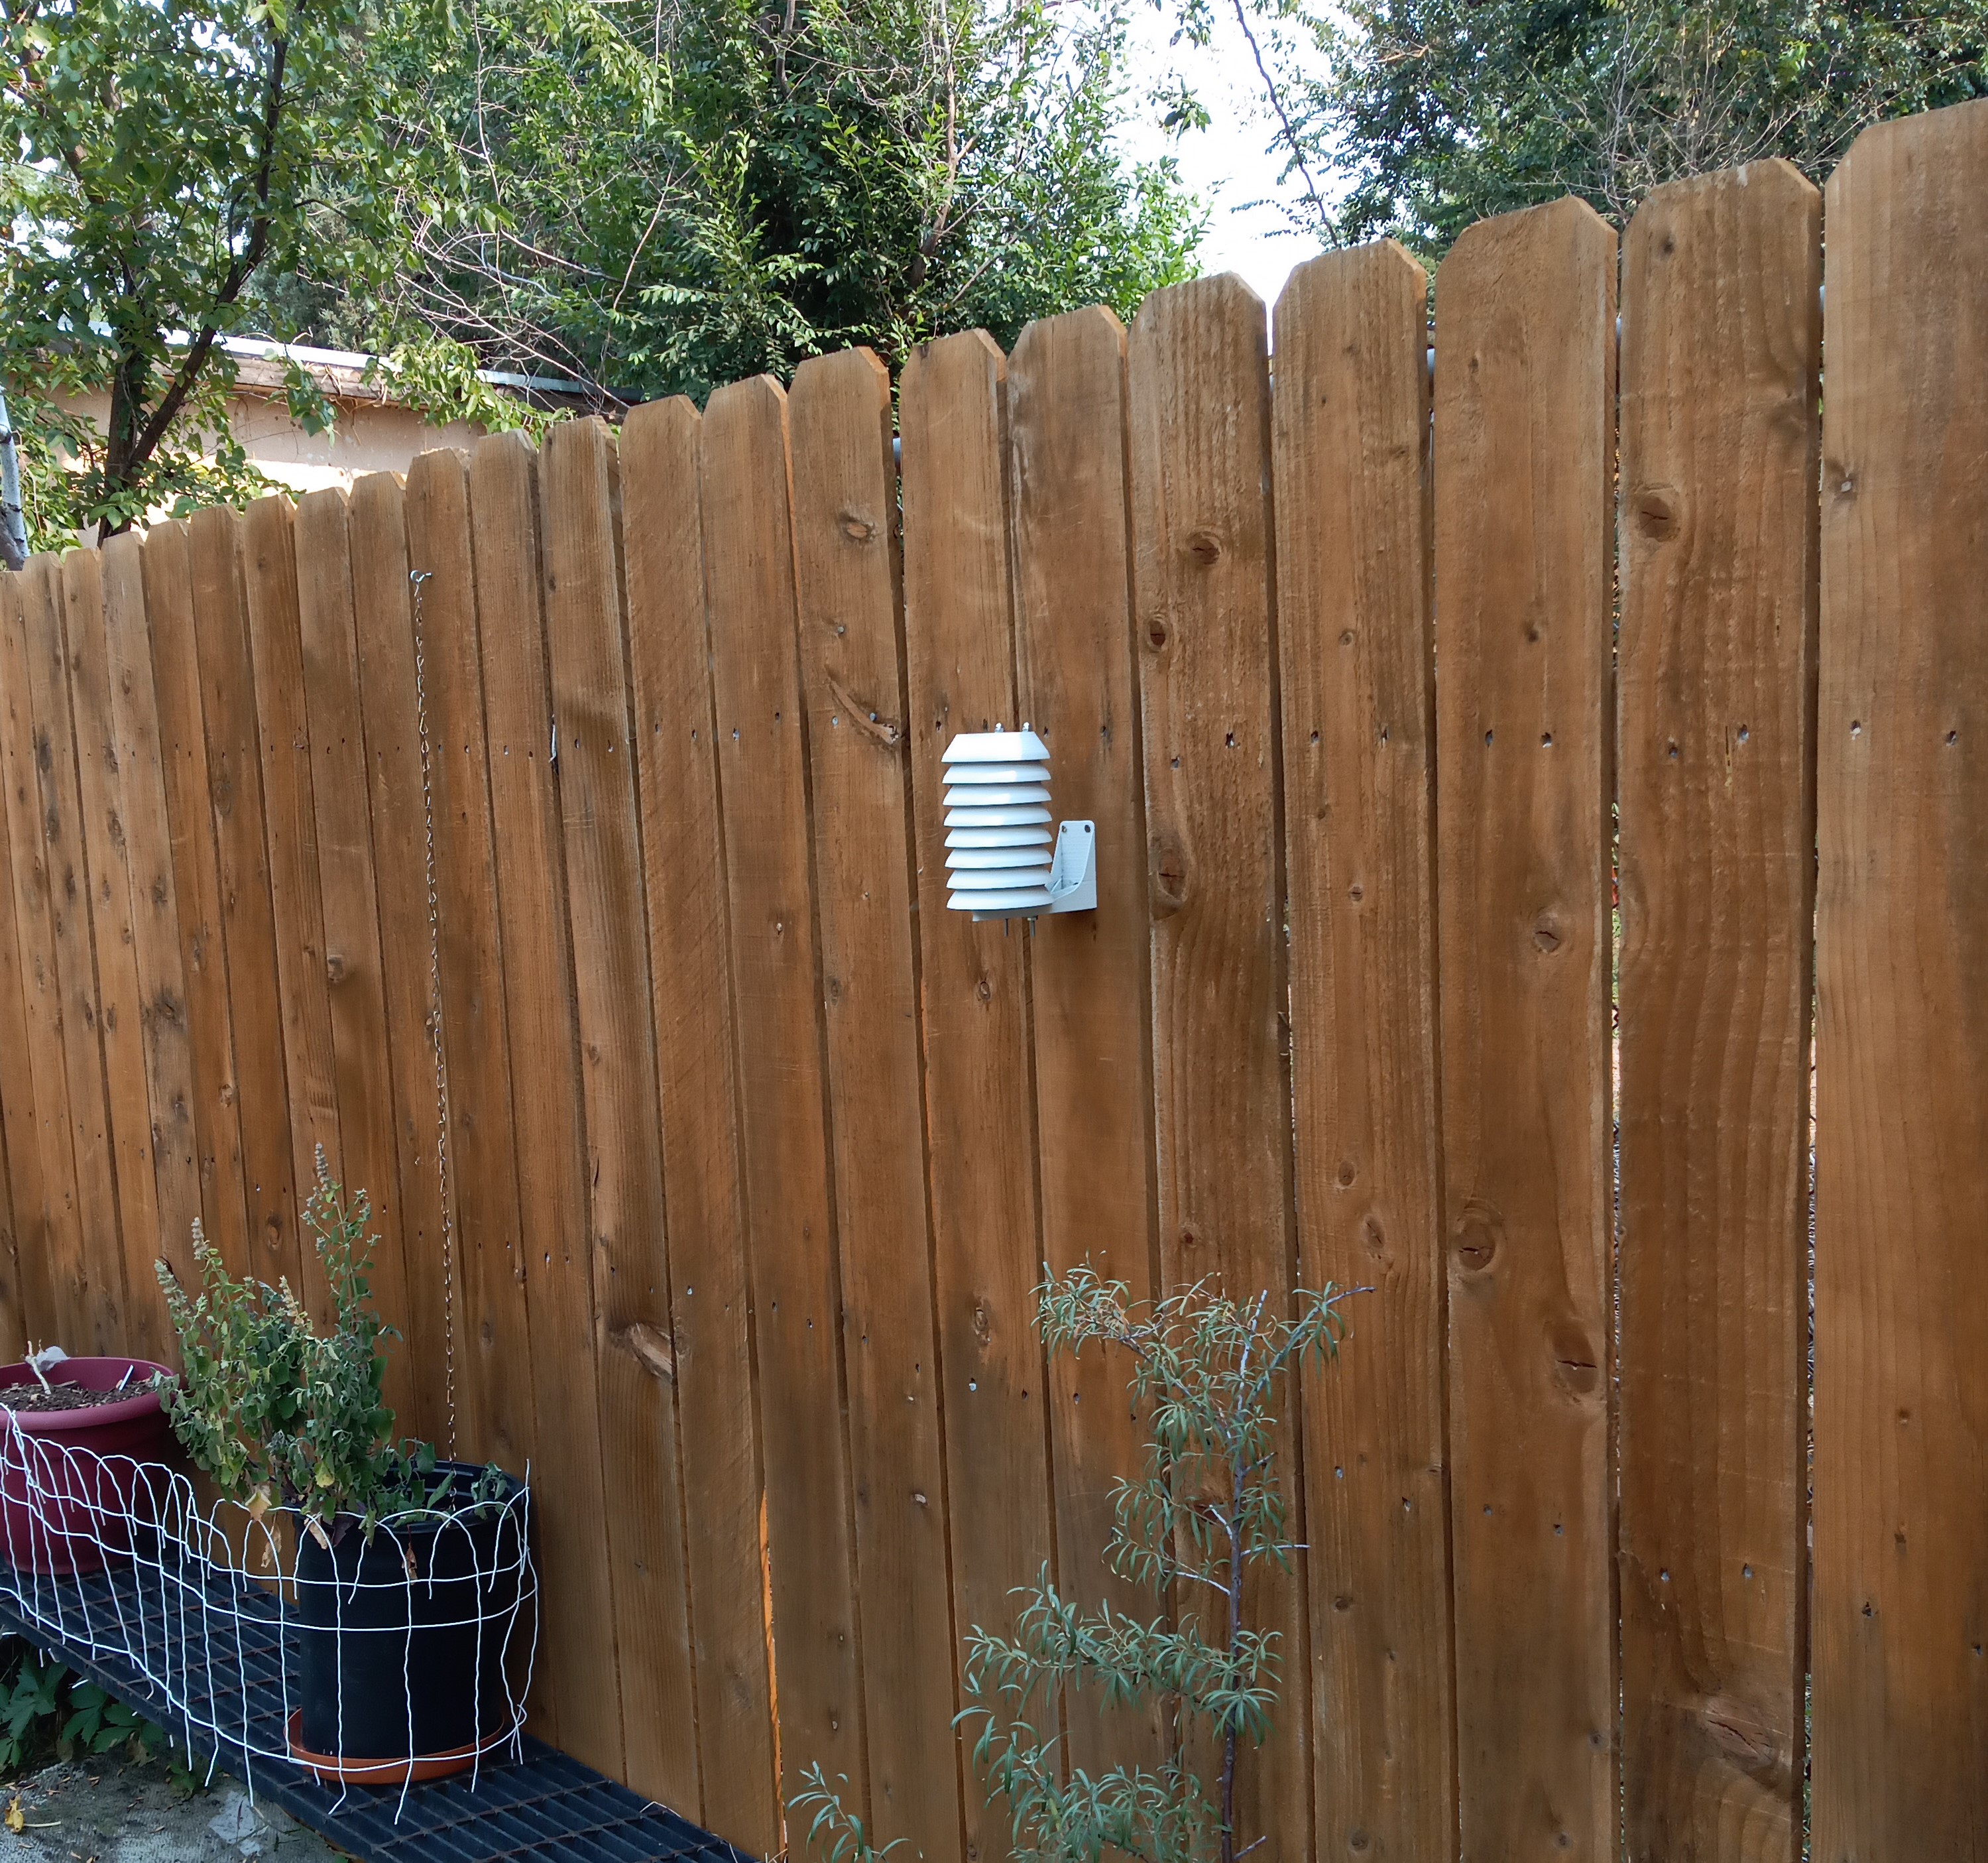
If what you built looks janky, just bolt it to something that looks even
jankier that you didn't build.
50/50 which goes first, the enclosure or the fence.
At the end of the day, it was pretty fun building something so
fast-and-(literally-) loose, the sensor works much better, and I think it looks
altogether quite professional hanging there on the back fence.
When I was working on getting this site hosted, I knew I wanted some basic
metrics reporting.
Just basic view counts and referrers, nothing so overbuilt or privacy-invasive
as Google Analytics.
Server logs would suffice but my hosting doesn't provide them, and I've been
out of the web game for long enough I started asking around my friends for
suggestions.
Among the responses I received was the following:
LOL I remember those hit counters from the 2000s
You are visitor NUMBER 219
Just do one of those
It would legit be so cool
Another friend, somewhat more helpfully, suggested
GoatCounter.
This ended up being a pretty perfect fit for my needs and what I ended up
going with, but my mind had already worked through how we might go about
building a geocities-style hit counter in 2020.
Plus, it would legit be so cool.
So, let's do it!
Basic requirements
For those who aren't clear what I'm talking about, what we're going for here is
something like this:
An old-school hitcounter, mined from the bowels of archive.org and used
without proper attribution like I'm the British Museum or something.
I'm not sure how these actually worked, I'd imagine just a cgi script that used
ImageMagick to glue the digit assets together into a final image,
although if you had cgi rendering yourself you could probably just
stuff the img tags for the correct individual digits and do it that way.
The former technique sounds better for our present purposes, for reasons that
should become apparent.
It's 2020, so let's assume the visiting browser can display SVG.
Let's try and write an endpoint that will keep an internal count, increment it
on each GET request, and return that as an SVG that shows the current number.
We can then just put that into an img tag and it should just work with
no AJAXy complications or client-side anything.
Note, though, we don't currently have any server-side anything either
(this site, for instance, being statically-hosted).
To make anything work at all, then, let's put our new endpoint up on
Google Cloud Functions.
This is google's version of lambda/serverless, and should allow us to (1) write
a function to service the GET request, (2) communicate with one of the various
datastores that google provides to maintain the counter state, and (3) render
the SVG code for return as the response payload.
Let's take these tasks in 3, 1, 2 order:
Implementation: the display
For this, we want something that takes an arbitrary integer and returns an
SVG document that draws it like we want.
Let's use the
drawSvg
module for the SVG manipulation.
First nail the basic geometry by assuming (very optimistically) six digits to
display, which we'll zero-pad from the left.
Make each digit 40 pixels wide by 60 pixels tall.
importdrawSvgasdrawN_DIGITS=6DIGIT_WIDTH=40DIGIT_HEIGHT=60defget_counter(n):"""Given integer n, returns a drawSVG.Drawing representing n"""d=draw.Drawing(width=N_DIGITS*DIGIT_WIDTH,height=DIGIT_HEIGHT)returnd
This will give us an SVG with the correct geometry, although there's nothing in
it yet.
We'll want some digits in there, which we'll presumably want to draw
individually, so let's write a helper that breaks those out:
defget_digits(n):"""return list of single-character strings, left-to-right the digits of n, zero-padded to N_DIGITS. Raise AssertionError if n exceeds representable digits"""fmtstr=f'{{:0{N_DIGITS}d}}'digits=list(fmtstr.format(n))assertlen(digits)==N_DIGITS,f'Overflow trying to fit {n}' \
f'into {N_DIGITS} digits'returndigits
Since we want the result to pad out to N_DIGITS, and since this might
conceivably change, we double-bag it on the format string.
Given the default value above, fmtstr ends up being '{:06d}',
and thus get_digits(69) returns ['0', '0', '0', '0', '6', '9']
(Note: there are many, many other ways of accomplishing what we're doing,
some of them a lot more fun.
Quick reminder that "fun" is not necessarily an admirable objective when
developing software in a a pedagogical or team environment).
Although perhaps not in keeping with the spirit of the geocities inspiration,
we also aggresively trap for an argument that's not representable in the given
width (instead of silently overflowing, trying to paste ancillary characters
outside the bounds of the SVG draw area, throwing a weird internal exception,
or other unexpected behaviors).
Thus, get_digits(1234567) will raise AssertionError.
To be totally rigorous, we should also check to make sure the argument is an
integer and positive-definite.
In a professional environment, we'd probably (hopefully?) have unit tests to
ensure that exceptional cases like these are handled with a minimum of surprise.
Now that we have these digits, we can apply them as text elements to our
Drawing.
We add these to the d object within the scope of get_counter above
like so:
There's some munging going on to get the characters to align, the details of
which I'll spare you (protip: just monkey with it between some combination of
code tweaks and devtools with liberal use of the refresh button until it looks
right).
We will, however, bow in the general direction of cross-platform visual
consistency by specifying a font, and go ahead and make the numbers white, to
show up against the dark background.
Except, we don't have a dark background yet.
The following needs to be specified farther up in the procedure so as to end up
on a lower z-layer, but we can use an SVG gradient to get the awesome drum
counter visual effect:
Put all together, get_digits(31337) then returns an SVG document that looks
something like the following:
Not bad for 55 lines of (mostly whitespace) code with no static assets!
Implementation: the deployment
To catch up, we now have a thing that, given a number n, will provide a
fancy SVG graphic depicting that number n in the most awesome 90s-tastic
fashion possible.
It remains to host this someplace that will allow for retrieval of those
graphics over the public internet, and which will hopefully take care of
incrementing n once per such request, thereby making it a proper hit
counter.
First, let's test that our svg generation works in a deployed environment.
Define a function test_counter of one argument, the flask.Request
object representing the request, but which we'll then ignore.
Have this return the svg data from a static n:
We also need a requirements.txt telling GCF that our execution environment
needs drawSVG.
Getting that to actually work will require a bit of configuration in the Google
Cloud Console, and I'm going to consider that out-of-scope for this treatment.
For one, there are a million blog posts out there about "how to get
started with Google Cloud Functions" that go through all that in detail, for two
they're all also probably out-of-date because google seems to change the
minutiae of the configuration pages quite frequently.
Google's own documentation is kept current and also surprisingly good, and I'd
refer any readers actually playing the home game to that.
Anyway, (waves hands), given the configuration of my project, this endpoint
is now available at
https://us-central1-geocities-counter.cloudfunctions.net/test-counter.
Amazingly it just works, with the xmlns presumably saving us from having to futz
about with MIME types or anything.
Now, to make it tick...
Implementation: data persistence
The GCF execution environment is ephemeral, so obviously we can't just use a
global variable to retain the counter state, or anything else that's tied to
the interpreter lifecycle.
So, although it seems like overkill, we're going to need to set up an external
datastore to retain this state.
GCP is absolutely resplendent with options for doing this: we could use
google's Bigtable or Spanner, a hosted instance of MongoDB or Postgres,
even a flat file in Google Cloud Store.
For this walk-through I'm going to use
firestore,
which is a NoSQL/document database that google took over with their acquisition
of Firebase and that's easy to get started with for projects like this.
As above, I'm going to skip the details of actually setting this up on the
Cloud Console side.
Suffice to say we've set up firebase for the project and defined a collection
called counter.
Now, we add a second function:
fromgoogle.cloudimportfirestoredefget_counter(request):"""GCF entrypoint: retrieves counter state from firestore, initializing if necessary. Increments this and persists to firestore, returning svg payload of counter displaying new count"""db=firestore.Client()doc_ref=db.collection(u'counter').document(u'count')doc=doc_ref.get()old_n=doc.get(u'n')ifdoc.existselse0n=old_n+1doc_ref.set({u'n':n})returndraw_counter(n).asSvg()
We need the firestore module from the google.cloud package for anything
to work, and this must be added to requirements.txt also.
Despite being a google product, the Cloud Functions execution environment
doesn't inject every possible dependency into the runtime, which we may assume
is a Good Thing.
When we instantiate a database client via firestore.Client(), it
does know, somewhat magically, that we want to connect to the project's
firestore, and it handles this connection, including authentication.
This is actually totally awesome since anyone who's done work like this
knows getting things to talk like that usually takes at least an hour, along
with a large repertoire of curse words to get working properly.
Even though the value we're trying to store is scalar, firebase makes us go
through a couple layers of abstraction to get there (being, of course, designed
to operate on much larger collections of data, the value of which we'll see in
the conclusion).
First, we must identify a collection (here called counter), which must be
created either through the Cloud Console or via calls to an API we won't treat
here.
The unit over which these collect is called a document, and these are
identified by unique keys.
We use the magic key count to identify our single document of concern.
The documents are (potentially heterogeneous) associative arrays, which are not
yet retrieved at this point.
This allows us to check for existence and apply default data if necessary,
allowing document lifecycle to be managed at the application level even after
relegating that of the collection to the infrastructure.
Finally, our scalar value of interest lives on a field of the document we call
n, which we then retrieve if the document exists and default to 0 otherwise.
We then increment this value, overwrite the document with the new value of
n, and pass it to draw_counter to generate our response.
Although it worked above when directly loaded, it turns out that browsers don't
seem to render svg in an img tag without either a .svg file extension (which
GCF doesn't allow) or the correct mimetype set, so we force that on the
response.
We then should be able to use this as the src value of an img tag,
like so:
Sit there and jam on the refresh button for a minute to prove to yourself it
works.
Conclusion
So that was fun, we've accomplished our goal of implementing a
server-side-rendered graphical hit counter I feel is very aligned with the
spirit of those we saw on geocities and other sites in the early days of the
public web (even if "server" has become a much more nebulous concept since
then).
Project files may be found at
https://github.com/drewhutchison/geocities-counter.
From here, there's a few places we could obviously go:
If we don't trust our clients to render SVG, we could use drawSVG's
.rasterize() method to return it as a PNG or whatever.
Maybe even predicate this on the contents of the request's Accept header.
A lot of hit counters back then used a different visual presentation:
7-segment displays, plaintext, or whatever.
My feeling is, if we're going old-school skeumorphic, go old-school
skeumorphic and stick with the drum counter, but since this is encapsulated
in the draw_counter method, we can really do whatever we want.
For instance, a bit of signed random added to the y argument of the
draw.Text constructor would give us a bit of jitter to the drums for a
more authentic 90s feel.
There's a classic race condition, in that two simultaneous requests
might retrieve the same n and both overwrite with their n+1, resulting
in a count being "lost".
Obviously this would be unacceptable in certain applications, and there are
well-known ways of preventing this, but I think for a simple hitcounter we're
OK.
This is really the dumbest thing possible and, except for the concern just
noted, will advance the count on each discrete GET request.
Most things like this are minimally interested in unique visitors.
Since we have access to the entire Request object, we could tamp this
down by IP, set a browser-side cookie, or employ some more-sophisticated type
of client fingerprinting to account for non-unique views (this need not be
invasive, in fact, GoatCounter employs a rather ingenious mechanism to track
unique visitors in a GDPR-compliant way. See https://www.goatcounter.com/gdpr
for details).
The latter would entail a modification of our use of the datastore: instead of
just incrementing a scalar n we would keep a set of identifiers (the IP,
some uniquely-identifying hash, or whatever) and return the cardinality of this
set.
The use of a document-store database like firestore makes this a very easy
change.
At that point, we could also do away with the magic key n entirely and
instead use the URL as determined from the request, and we're well
on our way to a full-featured analytics system, despite not changing the
public-facing API (of a GET to the function endpoint) at all.
But, that would have the effect of reducing the total count, and I think I get
more internet points the higher that thing goes.
Did you refesh the page to prove to yourself it's working yet?
A little over a year ago I decided to start carrying a multitool and,
not knowing anything about the product field, picked up a
Leatherman Wave+.
I've been more-or-less completely satisfied with it:
the scissors and wirecutters tend to runout a bit, but they're nonetheless
quite handy and the screwdriver is ingenious and by this point I can hardly
conceive of going back to life without it on my hip.
Now, this blog isn't, nor is meant to become a prepper/EDC lifestyle
accessory review site: there are plenty of those, they do a great job and
even go on to tell you what kind of hunter camo is in fashion this season to
wear at your wedding and stuff.
I digress.
I had an unpleasant experience attempting to service the above-mentioned
tool, and am calling that out as part of what I find to be a disturbing trend.
Last week I took my Wave+ fishing, and it ended up spending an hour or so
rolling around in bilgewater after falling out of my lap after I used it to
unset a hook and, well, you know how these things go.
This isn't the most respectful way to treat a tool, for sure, but it hardly
constitutes severe abuse near what you'd expect to damage a field tool like
this.
When I got back to shore I dried and oiled it but noticed it had picked up some
sediment internally that made the action a little gritty.
No problem, I'll just take it apart and clean it, as I've done with my
pocketknife any number of times.
Sound good?
Sounds good.
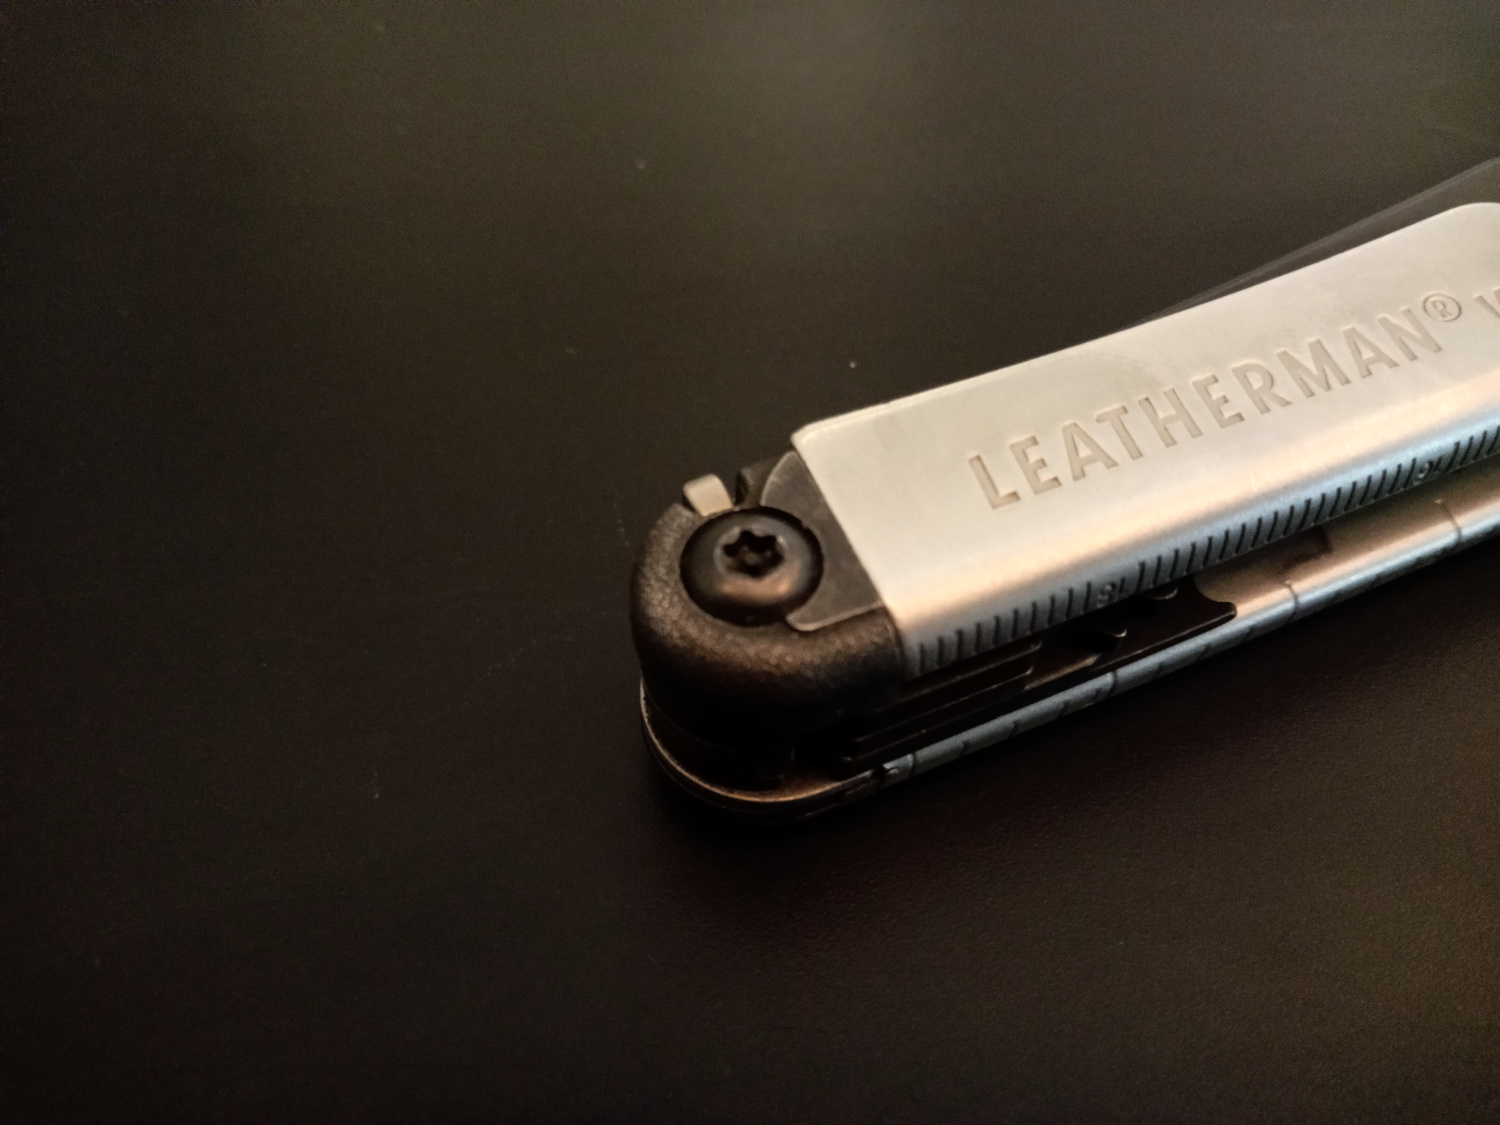
Except...
What the hell is THAT doing there?
There's an old joke about the Soviet economy: "they pretend to pay us and we
pretend to work."
I've always thought similarly about security fasteners: the manufacturer
pretends they're sufficient to deter any attempt at meddling by the end-user,
while the end-user pretends not to attempt any field service since the
requisite tools are obviously impossible to obtain.
In point of fact, bit sets for these fasteners were one of the first things I
remember e-commerce being AWESOME at providing.
I ordered a set in about 2003
(from an online vendor that wasn't Amazon... how different things were).1
Now, if ownership of a
security torx
bit set is the cost of entry to
attempt repair on a modern Leatherman tool, I'm basically OK with that.
Really I am.
It sets a baseline of earnestness and competence:
you've marketed the thing as a fine tool for the distinguishing craftsperson,
and you don't want your warranty department getting bogged down when JimBob
McHarborFreight ends up bending his the wrong way with help of a rusty
screwdriver and a pipe wrench.
Makes perfect sense.
And, in any case, I've got the right driver, right?
Except...
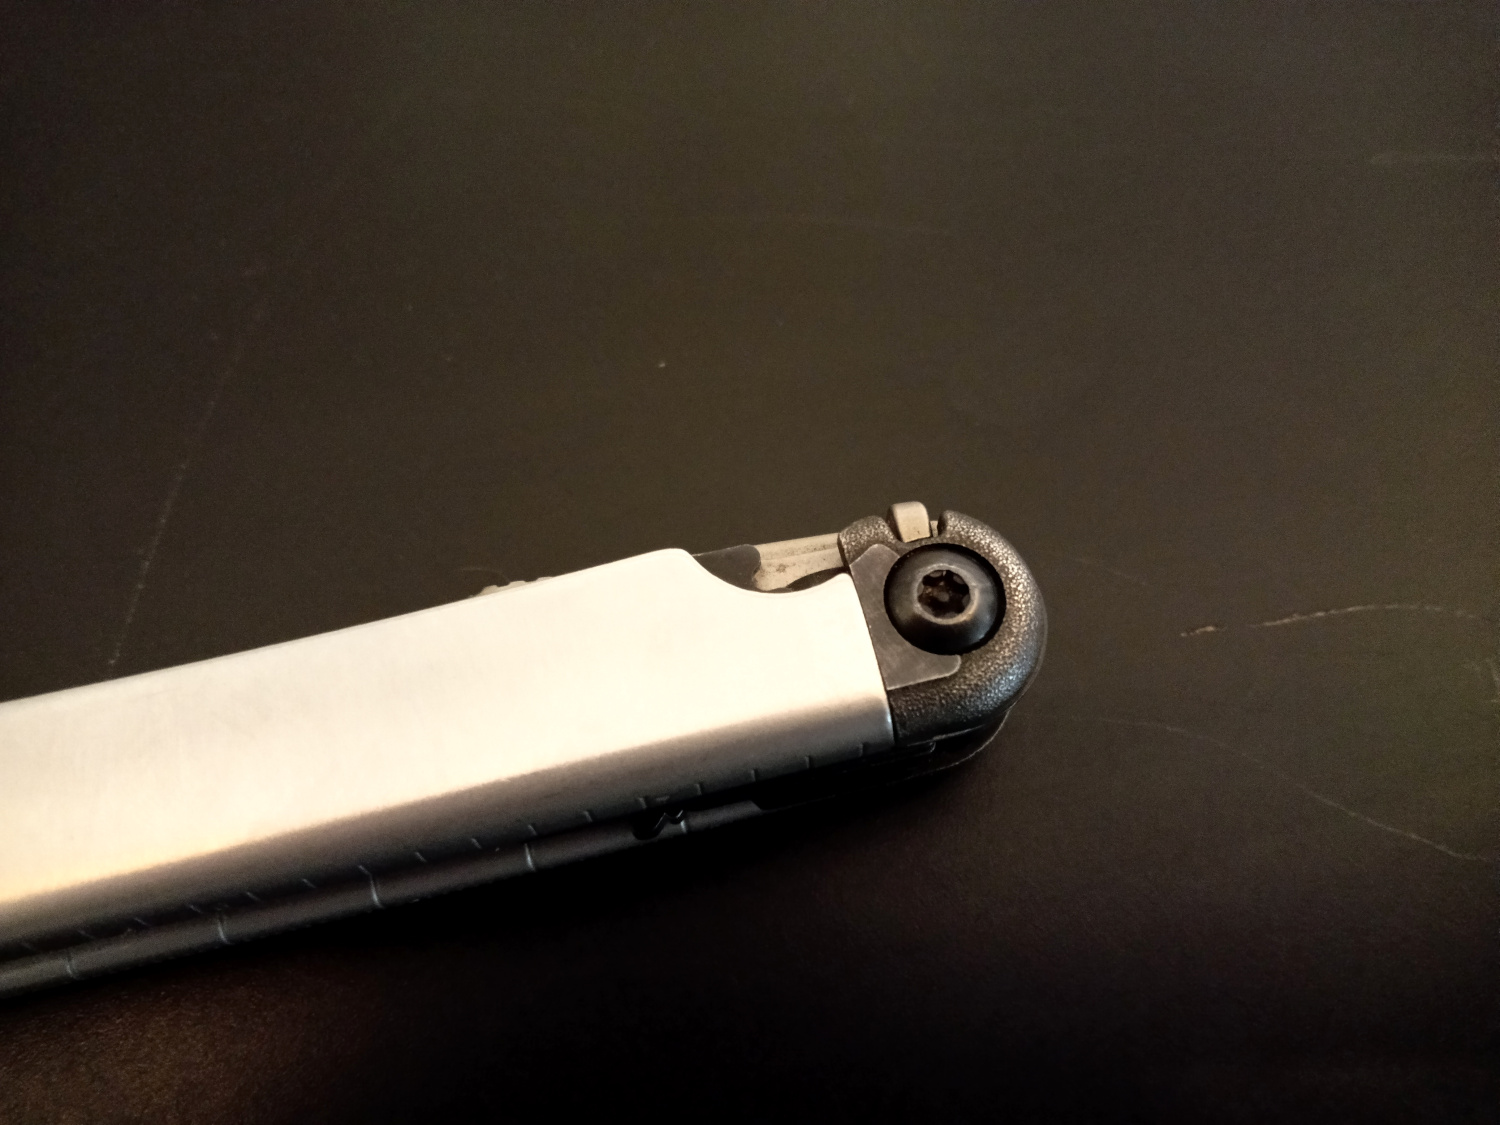
Double-what-the-hell-is-THAT doing there?
Yeah.
I have one.
Because anyone only ever needs one.
This is like how anyone only ever needs one can opener:
your can-opening needs, such as you ever encounter them, are perfectly met by
owning exactly one of the tool for the job, and no one is dumb enough to try
and design a can that needs two can openers applied simultaneously to work.
Yet there on the other side of the tool, that fastener mates another one with
the same drive type, necessetating a second identical driver.
This is literally the first time in my life I've ever had need of turning
more than one security fastener at the same time.
And it's all because some smartass engineer decided something like:
these fasteners just look cooler
(more cynically) we can drive repair revenue and product attrition through
by imposing arbitrary hurdles to owner maintenance
(most cynically) we can use this to drive2
sales of interchangeable bits
It turns out, (3) doesn't even make sense, since they don't even sell security
bits.
Way to hold the line there, leatherman, and keep those bits out the hands
of dangerous criminals.
You know, the types who might try to replace the battery in their own iPod or
turn off the seatbelt warning chime.
I honestly can't relate to the mindset of someone who, owning a tool company,
would intentionally design and build tools such that they can't be used to
work on themselves.
I suppose there's a possibility the reasoning aligned with another option:
we really don't trust our customers to undertake repair of their own tools
Looking at third-party repair instructions,3
there's some medium-complicated stuff in the stack: eccentric bushings and
friction washers, but nothing all that gnarly.
It can't any more complicated the spring-assist on my pocketknife, and that's
something I've torn down to clean enough times to confidently do it
blindfolded by this point.4
Again, I'm basically satisfied with the tool in every other way, but this kind
of overt hostility toward what should be their key customer base is the sort
of thing that might have me looking elsewhere when it comes time to replace it.
Remember I'm not a review site, and I wouldn't recommend against buying this
tool for this reason alone.
Just, if you plan on undertaking a major service operation — like cleaning
some grit out of the mechanism — without sending it in for factory service,
remember to factor in the cost of an extra set of security bits to the TCO.
Then you get to be the only person on your block with both a shiny new
Leatherman tool and an otherwise completely redundant set of same.
Notes
Around the same time, I worked in a physics lab with a Polish woman who
had a set that her boyfriend had machined himself.
If that isn't the most Eastern-European thing ever, I don't know what is, but
the point remains: these bit sets are not now, nor have they been remotely
difficult to obtain since about the turn of the century, at latest. ↩
No pun intended.
I considered changing it to "spur," but, same problem. ↩
Because third-party instructions are all that seem to exist.
I kind of doubt the existance of any kind of real service manual, maybe because
the
"User Guide"
is just a two-page product brochure covering their entire multitool line in
twelve languages.
Rest assured, though, their main website clocks in at 10MB over 168 requests.
Leatherman: we may not stand behind our products, but we'll glut your
connection with 10MB of FMV lifestyle porn in the attempt to sell you a new one.
Think of it as multitool-as-a-service.
↩
OK, maybe the spring-assist is a little easier because it uses regular Torx
fasteners because Kershaw are decent human beings.
To argue that's any real advantage begs the question. ↩
Every year about this time the weather starts getting interesting,
and every year about this time I kick myself for having forgotten that the
NWS SKYWARN spotter training classes are
only offered in March and April.
Luckily this year I wasn't doing much in April and our local NWS office did a
FABULOUS job of presenting the training courses online, so I finally got my
spotter ID.
It's causing me to pay more attention to the weather and to meteorology as a
science than I have since probably high school.
Aside from some intense thunderstorms this week (including a tornado warning
for cloud rotation observed within city limits, which is VERY uncommon),
it's also been uncharacteristically humid.
Humidity is something we don't often pay much attention to around here, on
account of its often never exceeding 30%.
But I started reading up on the subject and learned a couple interesting things.
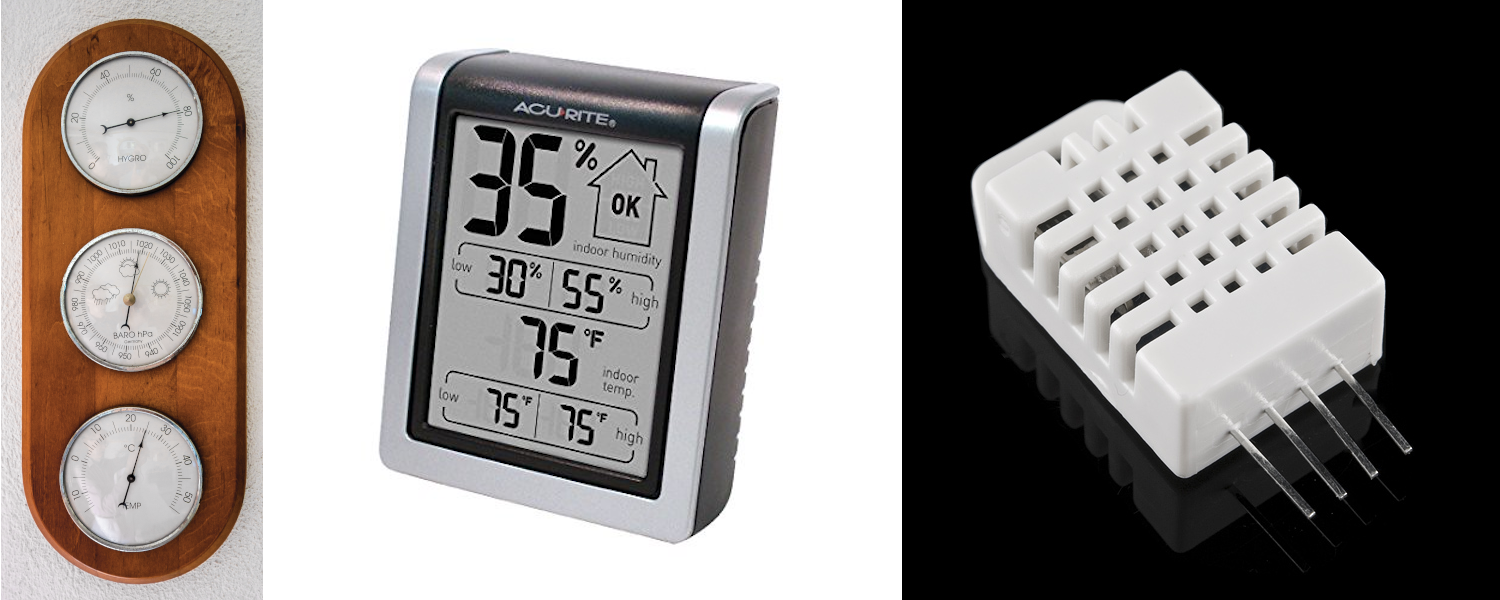
An instrument used to measure humidity is called a hygrometer, and they can
be made to work by any of various phenomena.
Mechanical dial-type gauges, such as may be found with a thermometer and
barometer on a wall-mounted weather station, work by measuring the distension
of a material or structure that expands and contracts in response to
atmospheric humidity; human hair is one such material.
The dielectric constant of air changes with humidity, so an electronic gauge
can be made to work by measuring the time constant of a circuit built around an
air-gap capacitor exposed to atmosphere.
Alternatively, solid-state sensors exist which utilize a material whose
resistance or other electrical properties change after absorbing moisture from
the air.
These are found in some consumer devices, as well as in the form of discrete
components which can be purchased and integrated with hobbyist or industrial
systems.
From left: Home weather station with dial-type hygrometer, barometer, and
thermometer (via Wikimedia Commons, photo by Friedrich Haag);
Low-cost digital thermometer and hygrometer;
Hobbyist capacitative-type discrete humidity sensor from Sparkfun
A different, arguably more direct device works on the principle that
evaporation occurs in inverse relationship to air humidity.
Thus, by measuring the temperature differential between the ambient air and an
thermometer evaporatively cooled in presence of same, the air humidity can be
determined.
Such a device is specially called a psychrometer.
These have two thermometers, one "dry bulb" which measures ambient air and one
"wet bulb" which is moistened and reads cooler because of evaporation.
Though I never built one, I remember seeing instructions in many childhood
science books for how to do so.
These were swung around over one's head to create enough airflow to
sufficiently cool the wet bulb; precision instruments use a calibrated fan or
blower to provide a known amount of airflow.
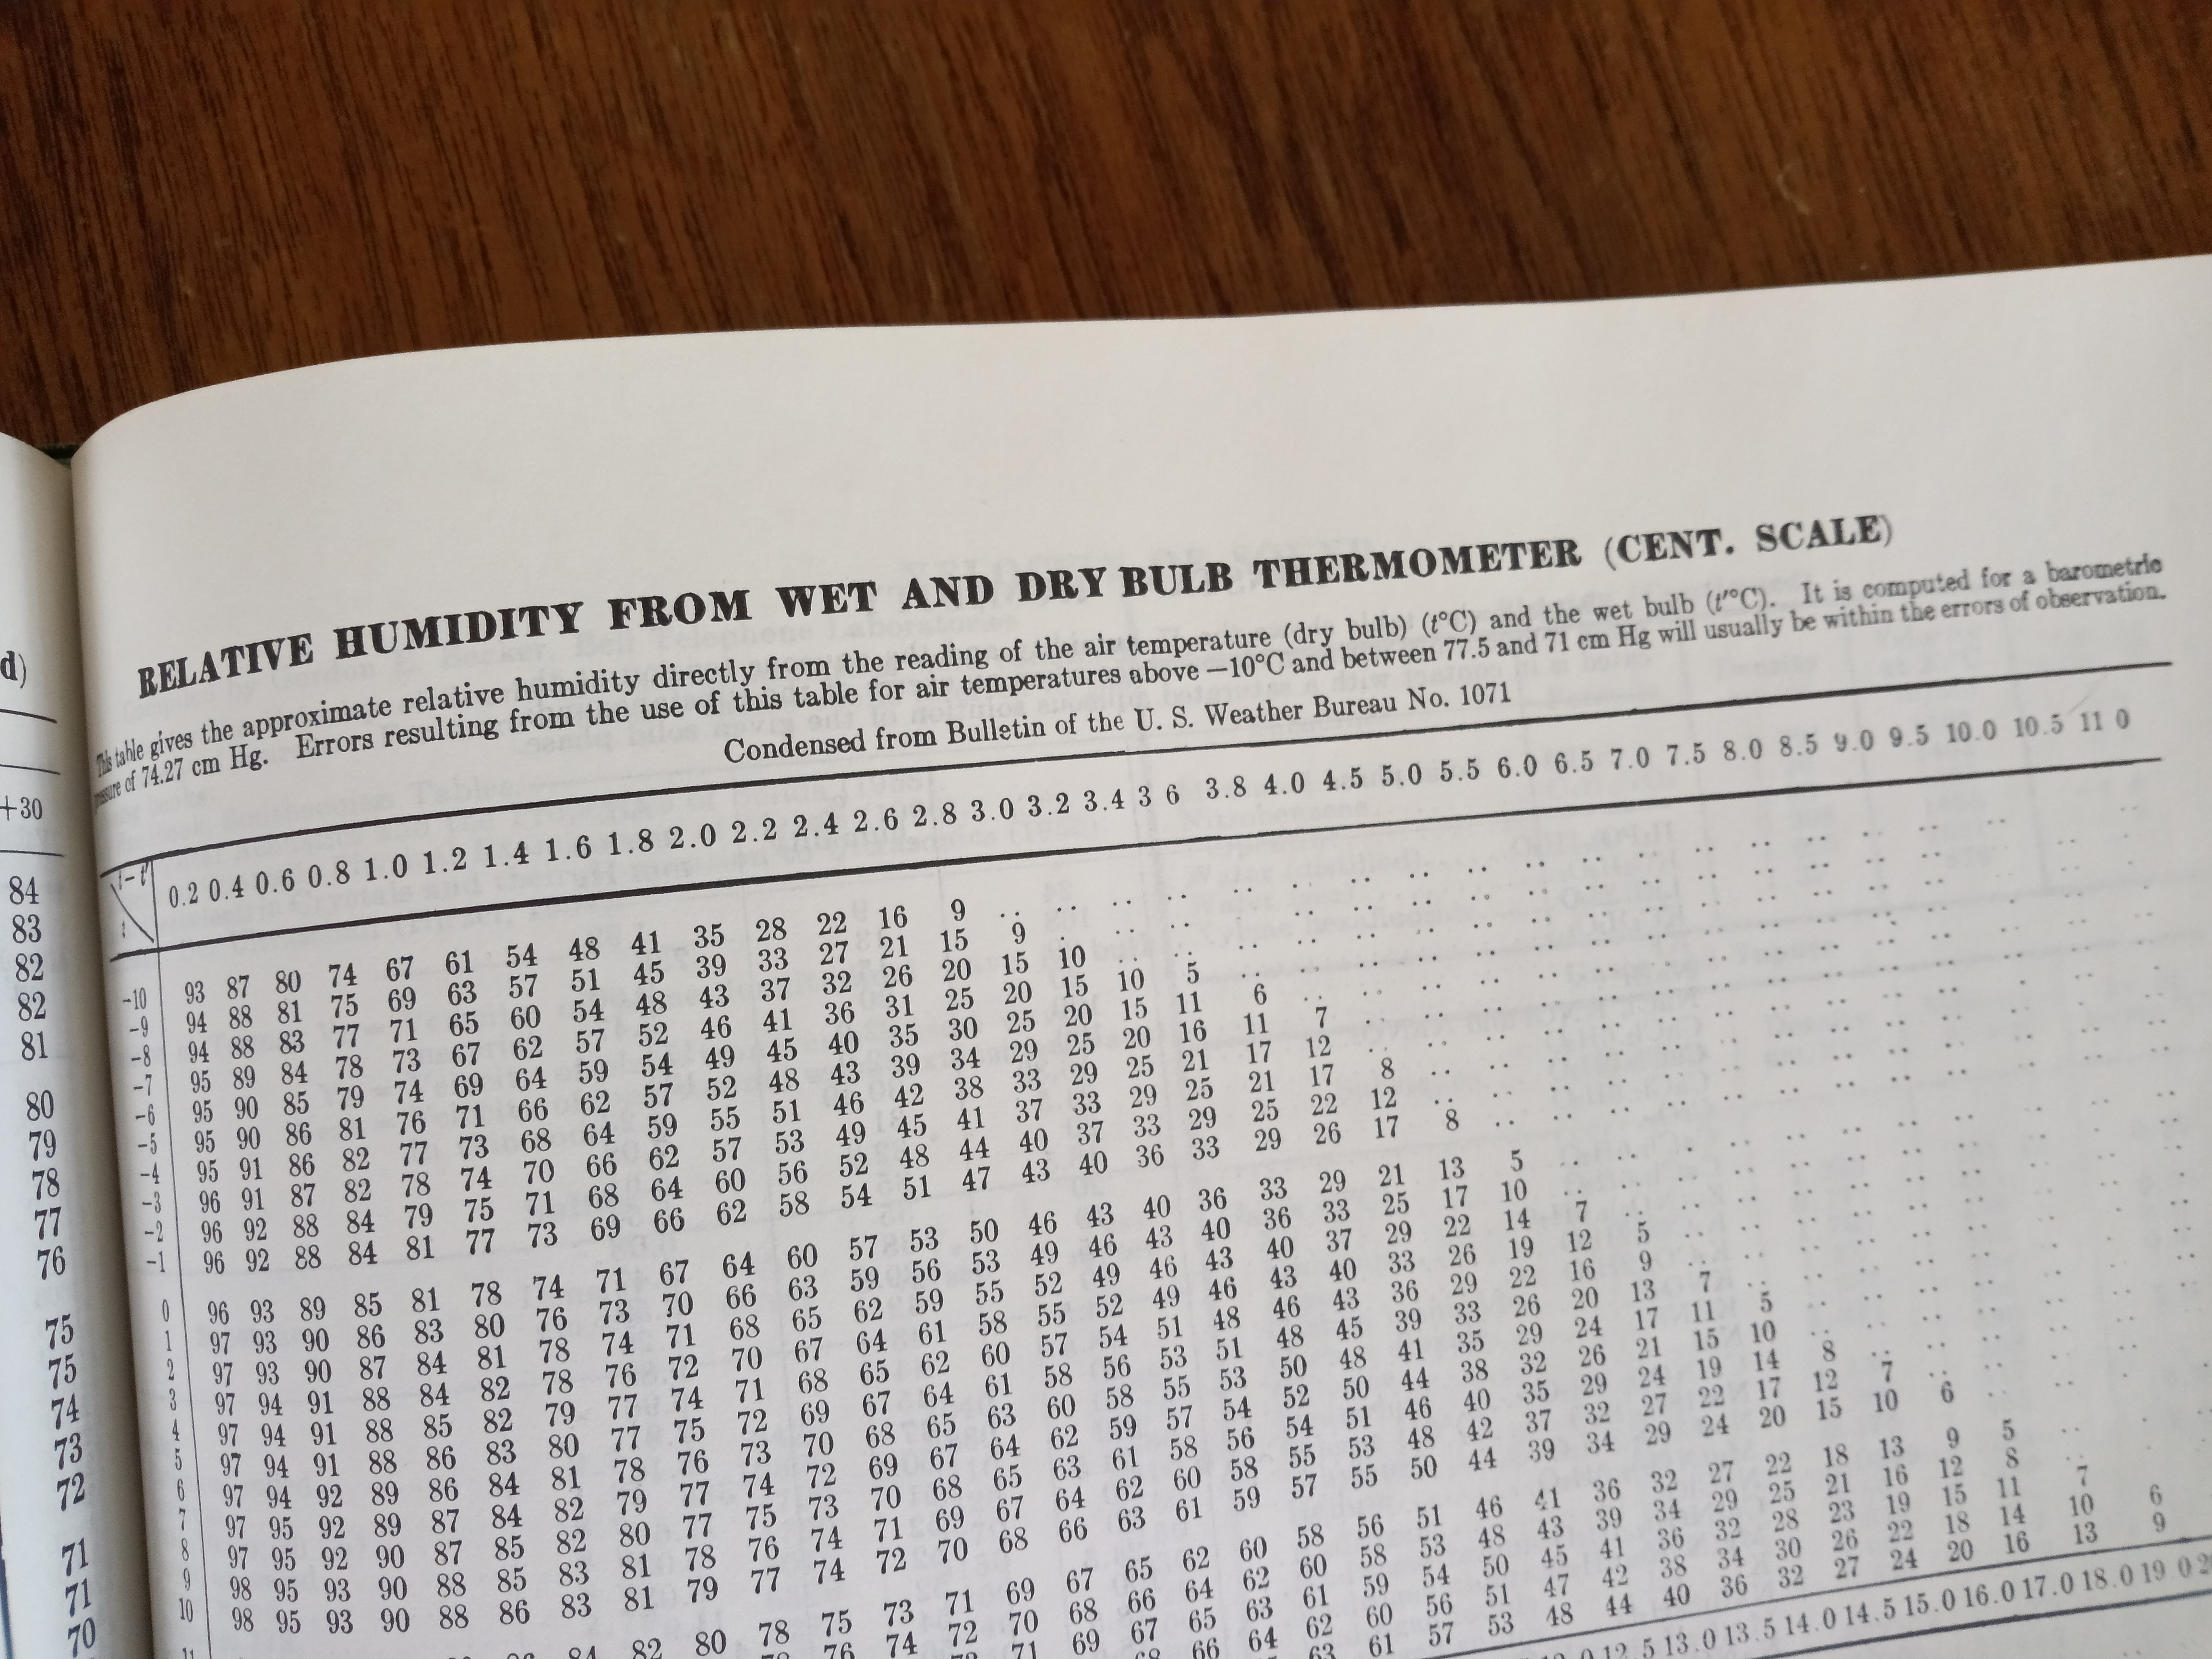
The relationship between humidity and the two temperature readings depends also
on barometric pressure, and, if there's an analytic formula describing this
relationship, I've never seen it.
Instead all I've ever seen are tables, like the one shown below.
In fact, I was given advice by a Physics instructor once to the effect of
"you need a CRC manual from roughly every ten years or so, because they stop
putting certain information in there.
I was trying to find a wet-bulb hygrometer table the other day and I had to
go back YEARS."
Fortunately my 1967 edition has one (alongside other then-useful-now-WTF
data like a table of haversines and the physical properties of whale oil).
Table of humidities as determined by psychrometer reading, from the CRC
Handbook of Chemistry and Physics, 48th ed. (1967-68)
Sources of error for this instrument will be temperature effects from things
other than the ambient air: radiative heating from the sun or other
surroundings, or direct impingement of precipitation, for instance.
You've probably seen the louvred enclosures at an airport (or, as my brother
pointed out, at the end of the coincidentally-named movie Heat) that are used
to mitigate these effects while allowing air more-or-less to freely circulate.
I learned from the
wikipedia article
that these are called Stevenson screens and that their namesake inventor was
the father of Robert Lewis of the name, author of Treasure Island (!)
A Stevenson screen
To conclude with one more interesting factoid from the wikipedia article:
One of the most precise types of wet-dry bulb psychrometer was invented in
the late 19th century by Adolph Richard Aßmann (1845–1918);
in English-language references the device is usually spelled
"Assmann psychrometer."
My girlfriend teaches at a local college which has what they call an
"innovation and creativity center."
This is like a hackerspace for college students: they have a small laser
cutter, a bank of FDM machines, the standard stuff.
Its purpose is to give students access to resources for product design, rapid
fabrication, and other resources that students might employ throughout their
studies.
When COVID hit and they sent most of the students home, a small group of
faculty and remaining student workers started turning that equipment to
produce PPE for local hospitals and other communities in need.
So now they're making face shields, with a throughput of a few hundred units
a week.
They're making a couple different models from the many that exist now (the
fire department has stated a preference for one model, the hospitals like a
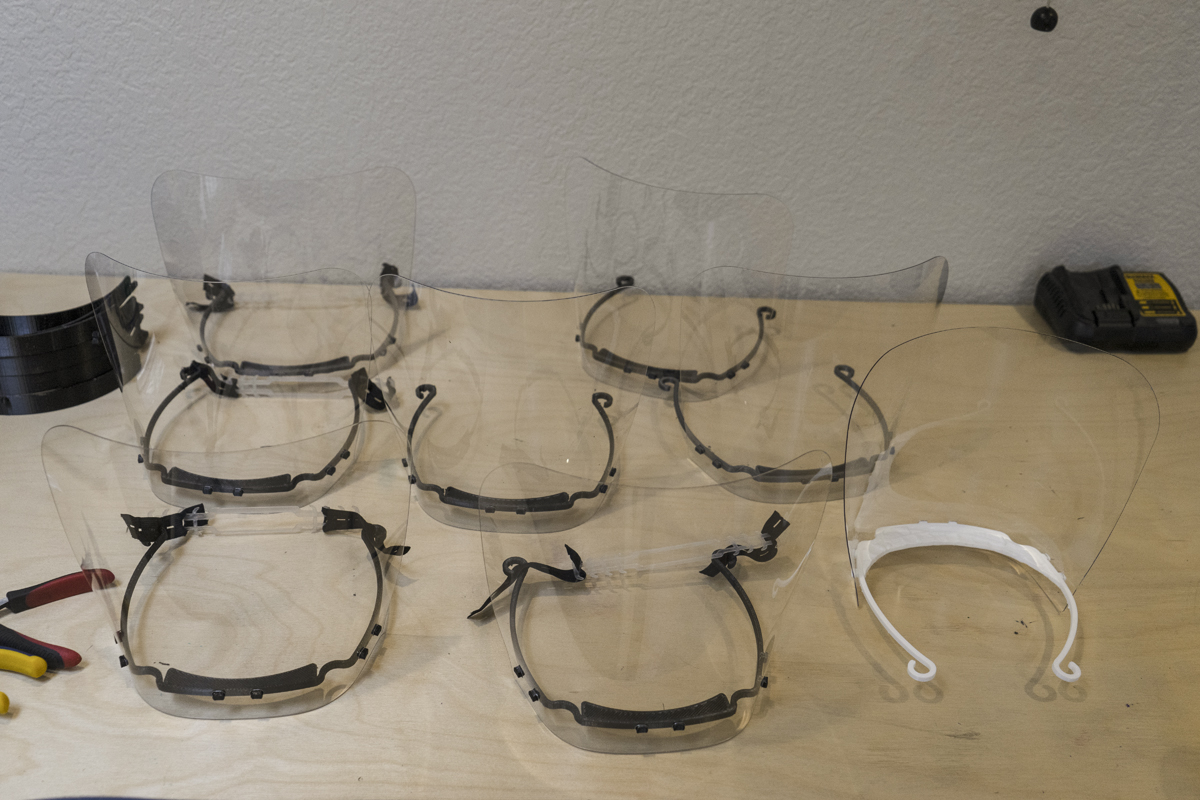
different one) but which are of the same general construction.
This consists of an FDM1
or resin-cast frame, which holds an elastic piece in back for securement and
a piece of transparent PET sheet that comprises the shield.
The latter piece is laser-cut both for general shape and for holes to mate the
mounting studs projecting from the frame.
Assembled facemasks.
Note the mounting of the shield material to the frame.
One problem they were having is that the PET sheet they've sourced comes
on giant rolls, and the material needs to be rough-cut down to fit on the
16x12" bed of the laser cutter.
The rolls are 48" wide, so this is easily enough cut down to either dimension,
but the difficulty comes in making a transverse cut across 48" of material
that's both reasonably square and also close to the 10" dimension required by
the design.
Some slop is forgivable, since each shield is cut entirely from the interior
of a piece and none of the rough cuts forms a finished edge.
But it was still proving awkward and cumbersome to measure and square this by
hand while managing the not-insignificant bulk of the roll itself.
This had become a bottleneck in their production process, so I decided
to build a fixture to help.
Design
Design requirements were pretty straightforward,
the fixture needed to provide three things:
Some means of retaining the spool and allowing it to unreel in slightly more
elegant fashion than just flopping around on the work surface.
If this can help prevent its getting scratched, so much the better.
Some form of stop, square to the axial dimension of the reel and against
which the working end of the material can be abutted and made fast.
Some sort of guide, rigidly fixed at the desired distance of ten inches
from the stop, along which a cutting tool may be worked.
While this allowed a lot of flexibility in implementation, a challenge was the
timing.
This was late March, when Amazon was still quoting lead times of 4-6
weeks on "nonessential" items, hardware and home improvement stores were
basically closed and I myself was trying not to leave the house.
Here's what I made do with parts (mostly) on hand:
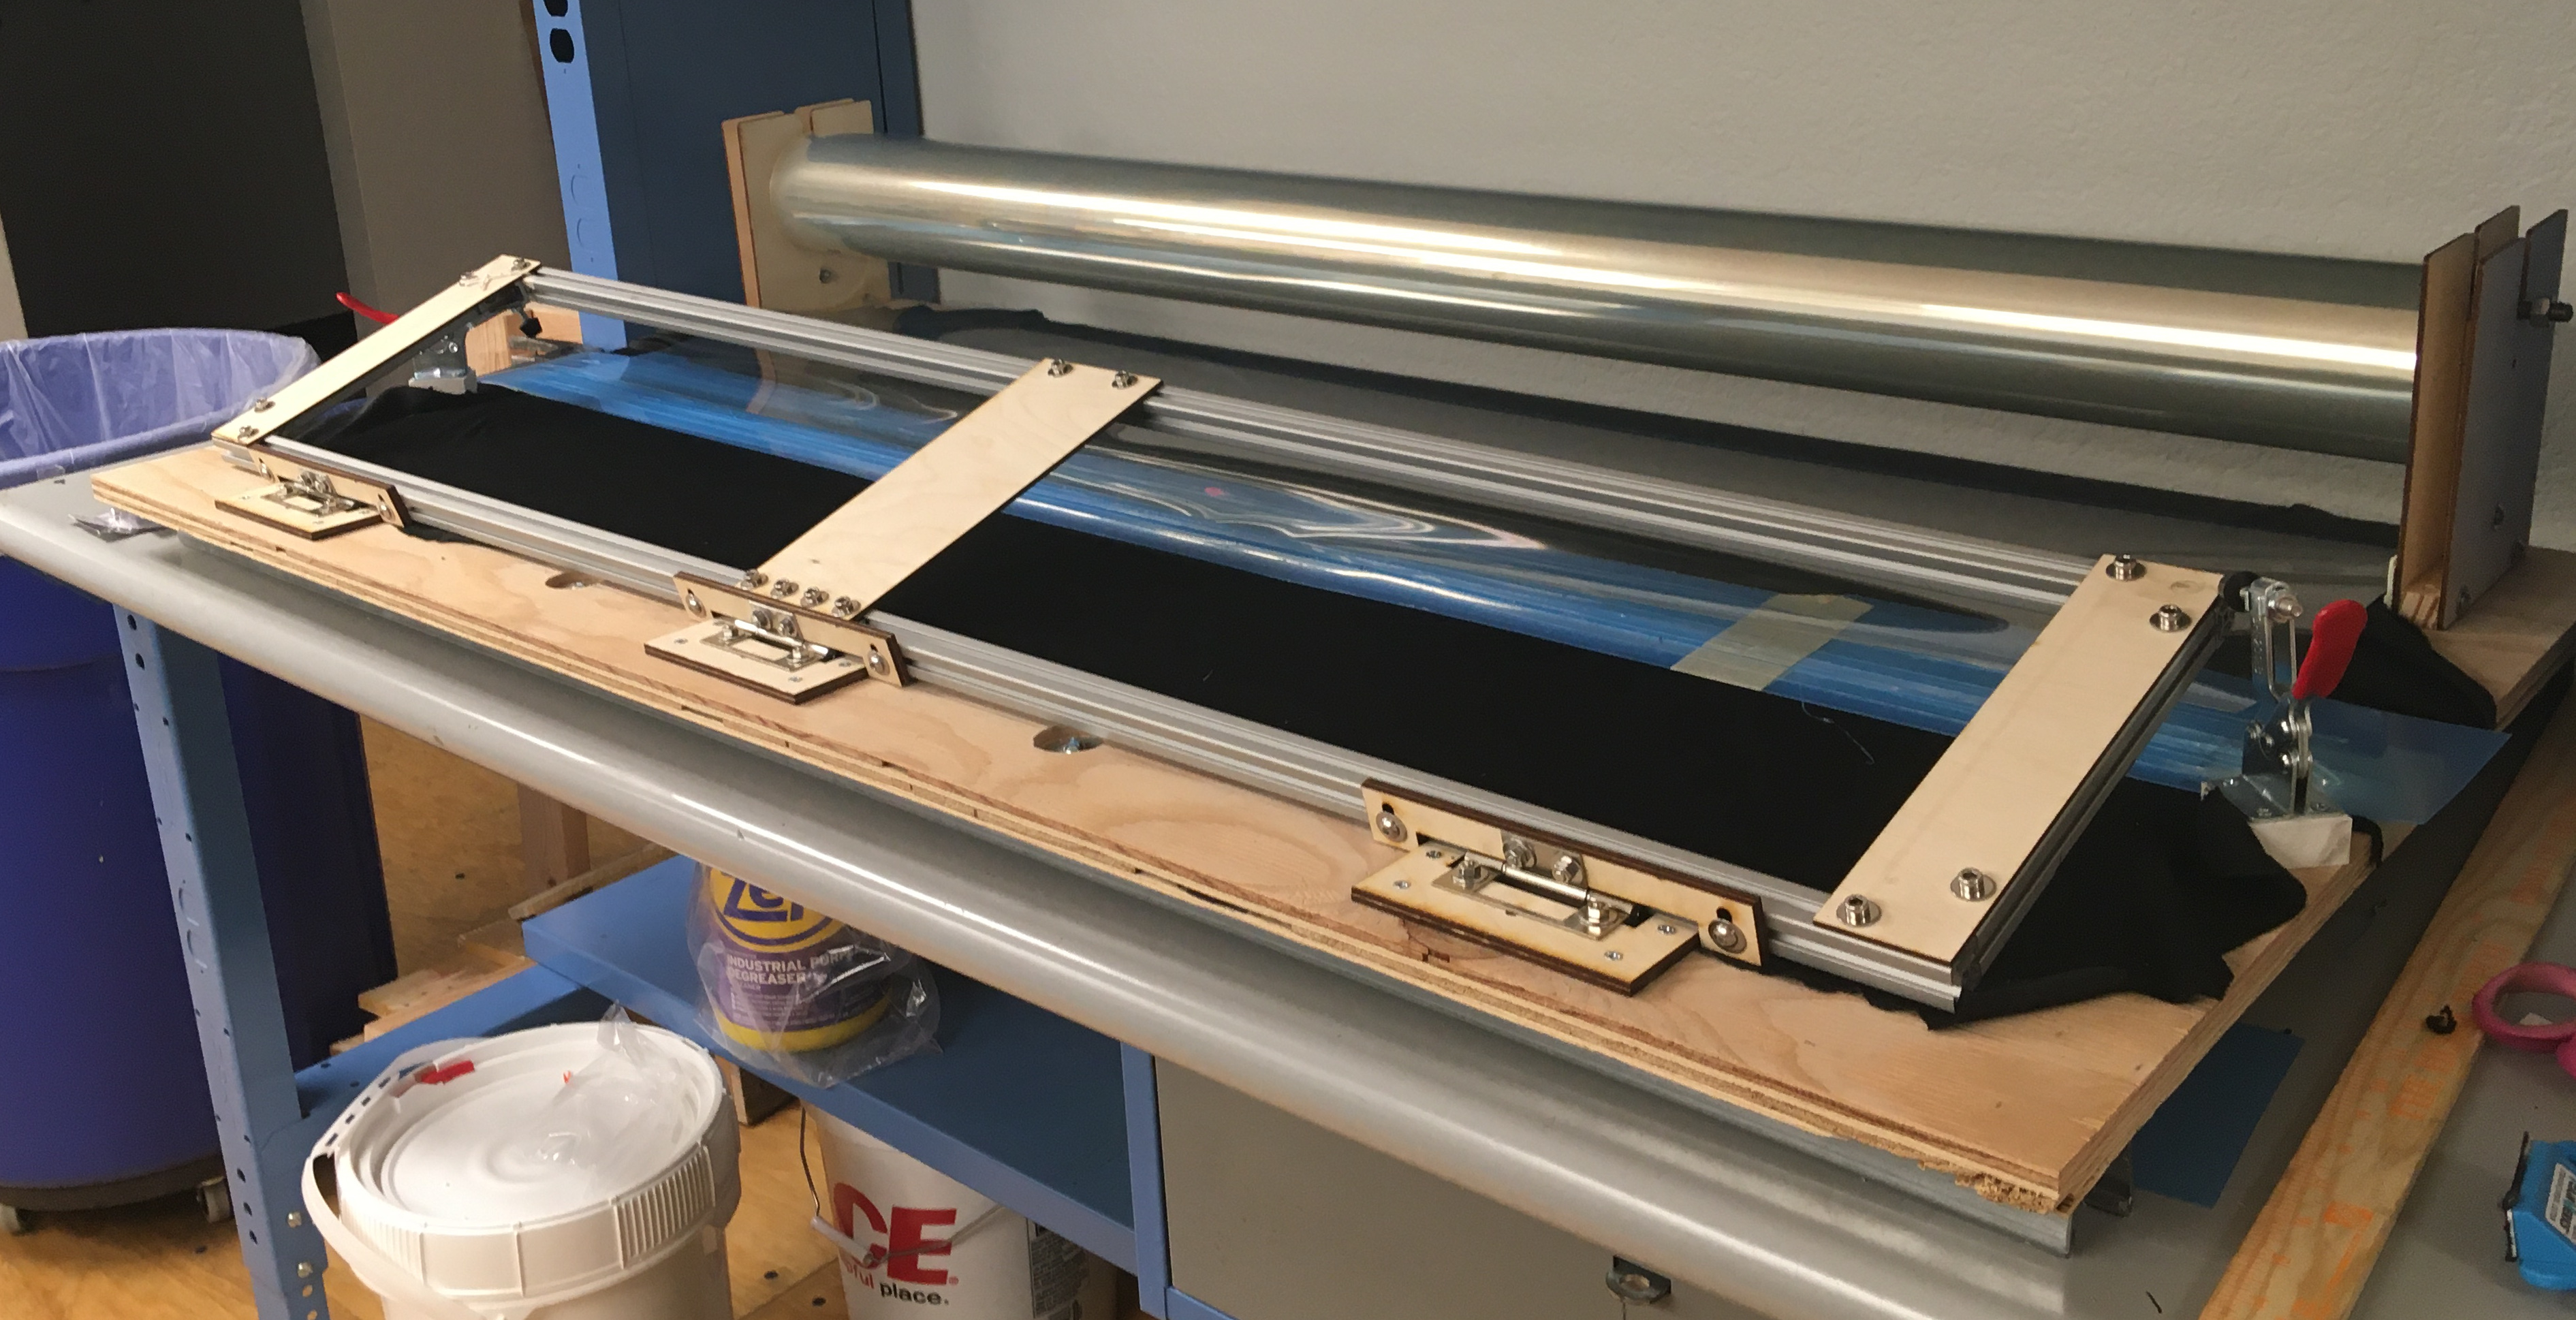
Assembly
The finished fixture
The base is cut from some 3/4" subfloor plywood I had lying around.
This was plenty rigid but a little more warped than was reasonable for the
application, so I counterbored from the top and tied into a couple
lengths of steel strut-channel, which got it straightened enough.
With the limited materials I had to work with, this construction is going to
be a bit rough.
The reel is stood-off on plywood that the innovation center was kind enough to
laser for me, sandwiching some scrap 1x1 for rigidity and tie-in to the base.
This plywood is slotted to accommodate a length2
of 3/8" all-thread, on which the ID of the spool sits.
The cutting guide is formed by the T-slot aluminum frame you see swung up
toward the image foreground.
This is corner-braced internally but also tied to more plates of laser-cut
plywood you see up top.
Edge-to-edge the frame is 10" wide,3
and serves to measure this dimension in the direction toward the spool from
the plywood seen screwed into the base, to which the hinges are affixed4
and which serves as the material stop.
When the frame swings down, it then defines a transverse line 10" from the
stop.
It can be toggle-clamped to hold the material in place, allowing the
operator both hands free to manage the cutting tool.
Lessons learned
Altogether this was a very edifying experience, for a couple of different
reasons.
From a systems perspective, this was a great object lesson in limiting
features to scope of project.
The engineer in me looks at requirement (1) above and
immediately starts picturing endcaps that mate the ID of the spool and ride
on sleeve bearings about the axial shaft such that the spool is balanced
around its CoG and spins freely and etc. etc.
That part of me is absolutely horrified at the thought of the spool just
rough-riding over a threaded rod like a roll of toilet paper5.
Yet, it turns out, that works just fine.
Any attempt to build a more elaborate mechinism would have taken longer to
design and fabricate, imperiled ourselves of a re-roll if something didn't fit
or otherwise work, and been more likely to fail "in the field."
Not the most elegant way to hold a spool, but it works.
Similarly, I spent a lot of time thinking about requirement (3) and whether it
would be easiest to build a hot-wire cutter versus a straight, hook, or rotary
blade, what type of guide would best support same, what kind of clearance or
cut-out might be required to accomodate the tool in the bed, etc. etc. before
shelving all of that and just building a straight-edge.
I figured that, if a captive tool were that important, I'd hear about it.
In point of fact, the operators have made do with a manual knife just fine;
the straight-edge was all that was required.
There's a lot of talk in engineering circles about the perils of
overengineering,
YAGNI,
project scope, etc.
For all that talk, actually being able to define and hit targets is still
largely a matter of good judgement and experience and something even seasoned
engineers often fail at.
Being able to take something from concept to delivery and see that it
succesfully meets a need is a rare pleasure and one that keeps me in these
fields.
From a personal perspective, it was also very gratifying to be able to execute
with the limited parts and supplies I had on hand.
For years (at least when it comes to small parts like fasteners and toggle
clamps), my policy has been to buy 25-100% more than I need for the current
project "in case I need 'em for something else later."
This doesn't always feel like the right thing to do, what with the additional
clutter it brings and the alternative convenience of modern supply chains.
Most of my personal projects spend a long time in what we'll call the
"concept/pre-procurement phase."
Being forced by circumstance out of that and directly into execution with just
the stock I'd accumulated "in case I need it" was, again, a very gratifying
and singular experience.
Notes
I'm not going to engage the debate of that FDM isn't a
great process for this (that's obvious).
With some finishing work they do make great positives for the
poured-silicone resin-casting molds, and there's been talk of tooling up an
injection molding machine.
Plus, when we've still got nurses wearing trashbags, it seems like any number
of masks coming off the FDM line are better than letting it sit idle.
↩
actually two lengths joined by a coupling nut in the middle.
Like I said, this construction is rough↩
As close as I could get it with a friend's cut-off bandsaw.
My friend has a mill, too, but the extra accuracy didn't seem worth it given
the possibility of deflection.
In any case, it's within a few hundredths, plenty accurate for the application.
↩
The hinge attachments are slotted to allow for truing the frame against the
stops, as well as translating the frame vercially to accommodate different
material thickness or protective underlays.
↩
with apologies for possibly overspending on the COVID zeitgeist
↩